Cart
0
You may also like

Book a call with our development team to get started.



Apply online and access wholesale pricing.

An explosion box DIY project transforms a simple cube into a multi-layered surprise that literally "explodes" open when the recipient lifts the lid. Unlike traditional DIY gift boxes, explosion boxes reveal decorated panels, photos, messages, and small gifts in a cascading unboxing moment. The format has gained traction on social platforms for anniversaries, milestone birthdays, and memory-keeping occasions where the presentation matters as much as the gift itself.
This tutorial walks through the measurements, materials, and assembly steps to create a basic three-layer explosion box, plus decoration ideas that elevate the final result. Whether you're crafting for a wedding, a graduation, or a personal celebration, the structure remains the same—only your embellishments change.
An explosion box is a hinged paper structure that collapses into a closed cube and opens flat when the lid is removed. The base layer typically measures 12 inches square and folds into a 4×4-inch box. Inside that base, you nest progressively smaller boxes—each one decorated with photos, journaling, pockets, or three-dimensional embellishments. When someone lifts the lid, the walls fall outward, revealing every layer at once.
The appeal lies in the surprise factor and the amount of content you can pack into a compact form. A standard three-layer explosion box offers five panels per layer (four walls plus a base), giving you 15 surfaces to decorate. That capacity makes it ideal for memory gifts—think anniversary timelines, baby's first year, or a collection of inside jokes.
From a packaging perspective, Packaging Strategies notes that personalized, interactive packaging formats are driving consumer engagement in the gift market. Explosion boxes deliver that interactivity in a handmade format, which explains their popularity in the DIY community and among small business owners offering custom gift services.
The material list for an explosion box DIY is straightforward, and most items are available at craft stores or online in bulk. Quality cardstock is non-negotiable—anything lighter than 65 lb will buckle under the weight of embellishments, and anything heavier becomes difficult to score cleanly.
Essential supplies:
Optional decoration supplies:
If you're producing multiple boxes for an event—say, bridesmaid proposals or party favors—consider purchasing cardstock in bulk and pre-cutting all pieces before you start assembly. A paper trimmer saves time and ensures uniform measurements across batches.
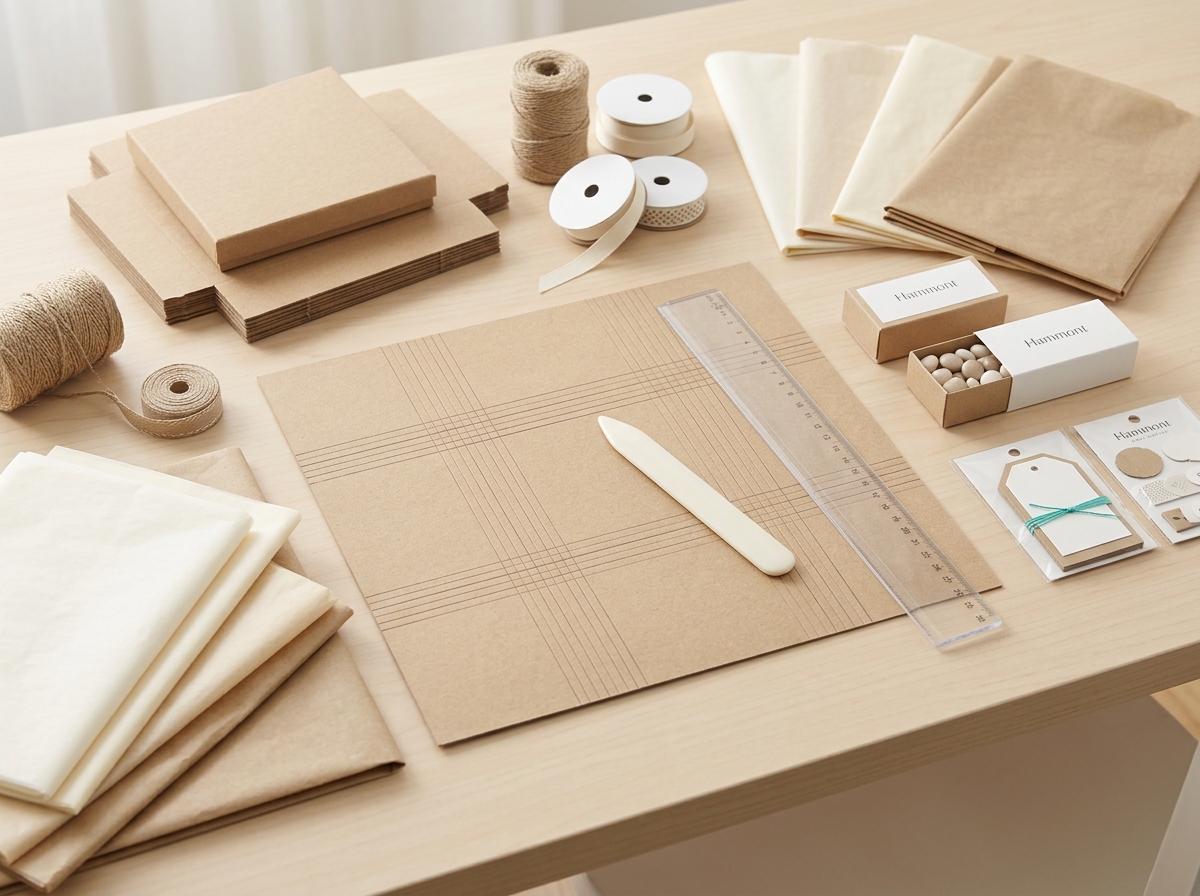
The base layer is the largest and forms the outer walls of your explosion box. Start with a 12×12-inch sheet of cardstock. You'll score this sheet at 4 inches on all four sides, creating a grid of nine 4×4-inch squares. The center square becomes the floor of the box; the four surrounding squares become the walls.
Step 1: Score the base. Measure and mark 4 inches from each edge of your 12×12-inch cardstock. Use a ruler and scoring tool to press a line (not cut) along each mark. You should end up with two horizontal and two vertical score lines, forming a tic-tac-toe grid. Fold along each score line to set the creases.
Step 2: Cut the corners. At each corner of the cardstock, you'll see a small 4×4-inch square. Cut away these four corner squares entirely. This leaves you with a cross shape—one center square with four flaps extending from each side.
Step 3: Test the fold. Fold all four flaps upward so they meet at 90-degree angles. The edges should align to form a box. If the walls don't stand cleanly, re-score the lines and fold again. Do not glue anything yet—this base layer stays unglued so the walls can fall flat when opened.
For a sturdier structure, line the inside of each wall panel with a slightly smaller piece of decorative paper (3.75×3.75 inches works well). This reinforces the cardstock and gives you a clean background for photos or journaling. Adhere the liners with a tape runner before you add any embellishments.
The inner layers follow the same scoring pattern as the base, just at smaller dimensions. Each layer nests inside the previous one, creating the stacked effect when the box is closed and the cascading reveal when it opens.
Layer 2 dimensions: Start with a 9×9-inch square. Score at 3 inches on all sides (creating 3×3-inch squares in your grid). Cut away the four corner squares. Fold and crease. This layer will sit inside the 4×4-inch base.
Layer 3 dimensions: Use a 7.5×7.5-inch square. Score at 2.5 inches on all sides (creating 2.5×2.5-inch squares). Cut corners, fold, and crease. This smallest layer nests inside Layer 2.
Once all three layers are scored and folded, stack them to check the fit. The walls of each inner layer should sit just inside the walls of the layer below. If any layer is too large, trim 1/8 inch from each edge and re-score. If it's too small, it will rattle around—better to err on the side of slightly snug.
To assemble the nested structure, apply adhesive only to the center square (the floor) of each inner layer. Place Layer 3 in the center of Layer 2, then place the combined Layers 2 and 3 in the center of Layer 1. The walls of all three layers should fold upward together when you close the box.
The lid is a shallow box that fits over the top of your folded explosion box. For a 4×4-inch base, cut a 6.125×6.125-inch square of cardstock. Score 1 inch from each edge, creating a smaller grid. At each corner, cut from the edge to the first score line (a 1-inch slit). Fold the flaps upward and overlap the corner tabs, securing with glue dots. The result is a 4.125×4.125×1-inch lid that slides snugly over the 4×4-inch box.
Decorate the top of the lid with a title, recipient's name, or a layered paper design. Some crafters add a ribbon loop or a small pull tab to make lid removal easier. If you're using the explosion box as a structured kraft gift box alternative for small gifts, reinforce the lid with a second layer of cardstock to support any weight.
The decoration phase is where your explosion box DIY becomes personalized. Each of the 15 panels (five per layer, three layers) can hold a different element—photos, handwritten notes, pockets with tucked-in cards, or three-dimensional embellishments like paper flowers or mini envelopes.
Photo placement: Print photos at 3×3 inches or smaller to fit within each panel. Leave a 1/4-inch border on all sides so the image doesn't extend to the fold lines. Adhere photos with double-sided tape or photo squares (foam tape adds dimension). Arrange photos chronologically for anniversary or baby boxes, or group by theme for friendship or travel memories.
Journaling and messages: Handwrite short messages directly on decorative paper, or print journaling blocks on cardstock. Common prompts include "Reasons I love you," "Our favorite memories," or "Things I'm grateful for." Keep text blocks to 2–3 lines per panel so they remain readable when the box is fully open.
Pockets and interactive elements: Glue small envelopes or folded paper pockets to one or two panels per layer. Tuck in gift cards, concert tickets, or handwritten notes that the recipient can pull out. Interactive elements extend the unboxing experience and add a tactile dimension beyond flat photos.
Three-dimensional embellishments: Paper flowers, die-cut shapes, or small charms add visual interest but require planning. Place bulky embellishments on the outermost layer or in corners where they won't interfere with the box closing. Test-close your box after adding each embellishment to ensure the lid still fits.
For party favors or small business applications, consider using themed zipper treat bags inside the center compartment to hold candies or small gifts. This keeps loose items contained and adds a professional finish to the presentation.
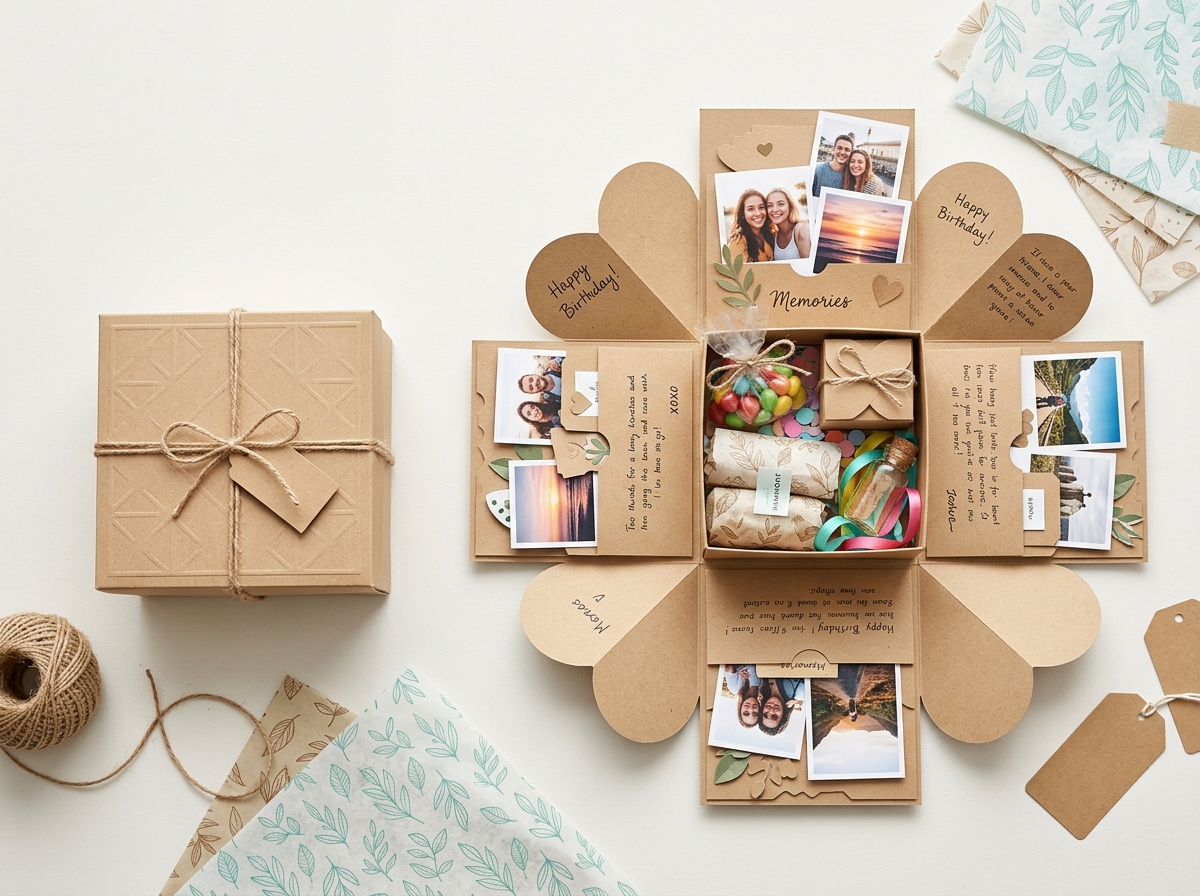
Explosion boxes adapt to any occasion through color choices, embellishments, and content. The structure stays the same; the theme drives your decoration decisions.
Anniversary or relationship milestones: Use one layer per year or one panel per month. Include photos from dates, ticket stubs, and inside jokes. A common layout dedicates the center compartment to a small piece of jewelry or a handwritten letter. Tie the closed box with ribbon in the couple's wedding colors.
Baby's first year: Dedicate each panel to a month, with a photo and a milestone note ("First smile," "Rolled over," etc.). The center can hold a pacifier, a hospital bracelet, or a small toy. Pastel cardstock and cloud or star embellishments fit the theme.
Graduation or college send-off: Fill panels with photos from all four years, messages from classmates, and advice for the next chapter. Use school colors for the cardstock and include a gift card in the center. This format works well for group gifts where multiple people contribute panels.
Friendship or "open when" letters: Create panels with different "open when" prompts—"Open when you're sad," "Open when you need a laugh," etc. Seal each message in a small envelope glued to a panel. The center compartment can hold a small self-care item like tea bags or a candle.
Travel memories: One panel per destination, with a photo and a souvenir (ticket stub, postcard, pressed flower). Use a small gift box in the center to hold additional mementos like foreign coins or a travel journal.
For holiday gifts, adapt the explosion box to fit seasonal themes—use red and green for Christmas, pastels for Easter, or black and orange for Halloween. The versatility makes it a strong option for birthday gift box ideas as well, where you can tailor every element to the recipient's interests.
A few technical details separate a beginner explosion box from a polished final product. Precision in scoring and restraint in embellishment make the biggest difference.
Score, don't cut. A scoring tool compresses the paper fibers without breaking them, creating a clean fold line. If you cut through the paper, the box won't hold its shape. For cardstock heavier than 80 lb, score twice along the same line to ensure a crisp fold.
Use the right adhesive. Liquid glue warps paper and takes too long to dry. Tape runners, glue dots, and double-sided tape provide instant hold without moisture. For heavy embellishments, foam tape adds dimension and distributes weight better than flat adhesive.
Test-close frequently. After adding each layer of decoration, close the box and fit the lid. If the lid doesn't slide on easily, you've added too much bulk. Remove or flatten embellishments until the box closes smoothly. A box that doesn't close defeats the surprise element.
Protect the finished box. Once decorated, explosion boxes are fragile. If you're gifting it in person, carry it in a shallow gift bag or a larger protective box. For shipping, place the closed explosion box inside a cube tuck-top box with tissue paper padding to prevent shifting.
Plan your layout before gluing. Lay out all photos, papers, and embellishments on each panel without adhesive. Photograph the layout for reference, then adhere one panel at a time. This prevents misalignment and ensures balanced visual weight across all layers.
Once you've mastered the standard 4×4-inch explosion box, variations let you adapt the format to different needs. Mini explosion boxes work well as party favors or add-ons to larger gifts, while shaped variations (heart, hexagon) add novelty for specific occasions.
Mini explosion box: Scale down all measurements by half. Start with a 6×6-inch base scored at 2 inches, a 4.5×4.5-inch middle layer scored at 1.5 inches, and a 3.75×3.75-inch inner layer scored at 1.25 inches. The finished box measures 2×2 inches closed. This size works for jewelry gifts, proposal boxes, or as a decorative element on a wrapped package.
Heart-shaped explosion box: Use the same scoring and folding technique, but trim the outer edges of each panel into a heart shape after assembly. This requires more advanced cutting skills and works best with a craft knife and cutting mat. Reserve this variation for romantic occasions where the extra effort enhances the theme.
Single-layer explosion box: For quick projects or when you're short on time, skip the nested layers and decorate only the base layer. Add a small gift or treat in the center, and focus embellishments on the four wall panels. This simplified version still delivers the surprise-opening effect with half the construction time.
For small business owners offering custom explosion boxes, consider using pre-scored cardstock templates to speed production. Cutting and scoring in batches, then decorating to order, reduces per-unit labor while maintaining the handmade appeal.
Material quality directly affects the durability and appearance of your explosion box DIY. Invest in good cardstock and reliable adhesive; skimp on embellishments if you need to cut costs.
Cardstock: Look for 65–80 lb cardstock in solid colors or subtle textures. Avoid cardstock with heavy glitter or foil coatings—these crack along fold lines and shed particles. Kraft cardstock offers a neutral base that pairs with any decoration style and photographs well for social sharing.
Patterned paper: Scrapbook paper works for panel liners and decoration, but check the weight. Anything thinner than 60 lb will show adhesive bleed-through. Single-sided patterned paper is fine for liners; double-sided is necessary only if both sides of a panel will be visible.
Adhesive: Tape runners (Tombow, Scotch) are the industry standard for paper crafts. Glue dots work for embellishments. Avoid glue sticks—they don't hold long-term and can yellow paper over time. For heavy items like charms or metal embellishments, use E6000 or another industrial-strength adhesive, applied sparingly.
Photos: Print on photo paper, not regular printer paper. Photo paper has a protective coating that resists fingerprints and fading. If you're creating a memory box meant to last years, consider archival-quality photo paper and pigment-based ink.
For bulk purchases, wholesale packaging suppliers often carry kraft cardstock and solid-color cardstock at lower per-sheet costs than retail craft stores. If you're making explosion boxes for a business, buying in bulk and storing pre-cut pieces can cut material costs by 30–40%.
Even experienced crafters encounter issues with explosion boxes. Most problems stem from measurement errors, adhesive mishaps, or over-embellishment.
Mistake: Lid won't fit after decorating. You've added too much bulk. Remove foam tape embellishments and replace with flat stickers, or trim 1/8 inch from the lid's interior flaps to create more clearance. Test-fit after every layer to catch this early.
Mistake: Walls don't stand upright when closed. Your score lines aren't deep enough, or you folded in the wrong direction. Re-score along the existing lines, pressing harder with your tool. Fold and unfold several times to set the crease.
Mistake: Inner layers slide around inside the base. You didn't center them properly, or the adhesive didn't hold. Lift the inner layers, apply fresh adhesive to the center square, and press firmly for 30 seconds. Ensure all layers are perfectly centered before the adhesive sets.
Mistake: Photos peel off over time. You used low-tack adhesive or applied it only at the corners. Use a tape runner to cover the entire back of each photo, or switch to photo squares (foam tape designed for photos). Press each photo down for 10–15 seconds after application.
Mistake: Box looks cluttered. You over-embellished. Explosion boxes benefit from white space—leave some panels simple with just a photo or a single line of text. Not every surface needs decoration. Edit ruthlessly before gluing.
Custom explosion boxes have a market among event planners, wedding vendors, and gift services. Pricing depends on size, decoration complexity, and whether you're providing the content (photos, messages) or the customer is.
A basic three-layer explosion box with customer-provided photos and minimal embellishments typically runs $25–$40 retail, depending on your market. Fully custom boxes with original design, printed elements, and premium embellishments can command $75–$150 for milestone events like weddings or milestone anniversaries.
Production time for a single box ranges from 2–4 hours, including cutting, assembly, and decoration. To make small-batch production viable, create an assembly line: cut all pieces in one session, score and fold in another, then decorate. This reduces per-unit time to 60–90 minutes for repeat designs.
For packaging and presentation, nest the finished explosion box inside a slightly larger gift box with tissue paper. This protects the box during transport and adds a second layer of unboxing. Consider offering custom packaging options as an upsell—branded tissue, custom ribbon, or a printed care card.
Material costs for a standard explosion box run $3–$7 (cardstock, adhesive, basic embellishments), giving you a healthy margin even at mid-range pricing. The labor intensity limits scalability, but the high perceived value and social media shareability make explosion boxes a strong offering for custom gift businesses.
Material costs for a basic three-layer explosion box range from $3 to $7, depending on the quality of cardstock and embellishments you choose. This includes three sheets of 12×12-inch cardstock (approximately $1.50), adhesive ($1–2), and basic decoration supplies like patterned paper and ribbon ($1–3). If you're adding photos, factor in printing costs of $0.25–$0.50 per 3×3-inch print. Bulk purchasing reduces per-unit costs significantly if you're making multiple boxes.
The most common explosion box size is 4×4 inches when closed, built from a 12×12-inch base layer scored at 4-inch intervals. This size accommodates 3×3-inch photos and fits comfortably in most gift bags. For mini versions, use a 6×6-inch base scored at 2 inches to create a 2×2-inch closed box. Larger boxes (6×6 inches closed) start with 18×18-inch cardstock, but these require heavier-weight paper to maintain structure and are harder to decorate without over-embellishment.
A first-time crafter should expect 3–4 hours to complete a fully decorated three-layer explosion box, including cutting, scoring, assembly, and embellishment. Experienced crafters can reduce this to 90 minutes to 2 hours. The decoration phase takes the longest—plan 15–20 minutes per layer if you're adhering photos, adding journaling, and placing embellishments. Pre-cutting all pieces and planning your layout before you start gluing can cut total time by 30–40%.
Yes, but explosion boxes require protective packaging for shipping. Place the closed box inside a slightly larger rigid box with at least 1 inch of padding (bubble wrap or tissue paper) on all sides. Mark the package "Fragile" and avoid shipping services that involve multiple transfers. Explosion boxes with heavy embellishments or protruding elements are at higher risk of damage in transit. For long-distance gifts, consider simplifying the decoration or hand-delivering when possible.
An explosion box is designed to open flat, revealing all interior panels simultaneously when the lid is removed. Regular gift boxes are static containers that simply hold items. Explosion boxes function as both packaging and content—the decorated panels are the gift, often featuring photos, messages, and memories. Traditional gift boxes focus on protecting and presenting a separate item inside. Explosion boxes take significantly more time to create but deliver a personalized, interactive unboxing experience that standard packaging cannot replicate.
Explosion boxes suit occasions where the presentation carries as much meaning as the gift itself—anniversaries, milestone birthdays, graduations, or friendship celebrations. The format rewards the time invested with a highly shareable, memorable unboxing moment that recipients often keep as a keepsake rather than discard like traditional wrapping.
For crafters exploring paper-based gift packaging, explosion boxes offer a step up in complexity from basic folded boxes but remain accessible to beginners willing to work methodically. The skills you develop—precision scoring, layout planning, and adhesive selection—transfer to other paper crafts and packaging projects.
If you're short on time or need a simpler option, consider a pillow box or a standard decorative gift box paired with a handwritten card. Save explosion boxes for occasions where the extra effort aligns with the significance of the event. The format's impact is diluted when overused, but deployed thoughtfully, an explosion box DIY transforms gift-giving into an experience the recipient will remember long after the contents are gone.