Cart
0
You may also like


Book a call with our development team to get started.


Apply online and access wholesale pricing.

Creating your own gift boxes transforms ordinary presents into memorable experiences. Whether you're a small business owner looking to elevate your packaging, a crafter seeking unique party favors, or simply someone who loves the personal touch of handmade gifts, DIY gift boxes offer endless creative possibilities while keeping costs manageable. This comprehensive guide walks you through everything from selecting the right materials to mastering folding techniques, with practical tutorials and troubleshooting tips for boxes that look professional and hold up beautifully.
The art of box-making is more accessible than you might think. With a sheet of cardstock, basic household tools, and clear instructions, you can create custom packaging in minutes. Beyond the satisfaction of handcrafting, DIY boxes allow you to control every detail—size, color, pattern, and finish—ensuring your packaging perfectly matches your gift, event theme, or brand identity.
The decision to make gift boxes by hand goes beyond simple cost savings. Handmade packaging communicates thoughtfulness and care in ways that store-bought options cannot match. When you create a box specifically for a recipient or occasion, you're adding an extra layer of meaning to the gift itself.
From a practical standpoint, DIY gift boxes solve common packaging challenges. Standard retail boxes come in limited sizes, often leaving you with too much empty space or forcing you to choose a container that's slightly too small. Custom-made boxes fit your items exactly, eliminating the need for excessive filler material and creating a more polished presentation.
For small business owners and crafters who sell handmade goods, custom packaging serves as a powerful branding tool. A thoughtfully designed box reinforces your brand identity with every order, creating a memorable unboxing experience that encourages repeat customers and social media shares. The packaging industry continues to grow, with paper and paperboard segments leading the market, reflecting ongoing consumer interest in quality presentation and sustainable materials.
Cost efficiency becomes particularly significant when you need boxes in quantity. Wedding favors, party gifts, or product packaging for a small business can require dozens or hundreds of boxes. Making your own reduces per-unit costs substantially, especially when you purchase cardstock in bulk. A single 12×12-inch sheet of quality cardstock typically costs between 50 cents and one dollar, yielding a finished box that would retail for three to five dollars or more.
The environmental angle matters too. When you make boxes yourself, you control the materials, choosing recycled cardstock or sustainably sourced paper. You also eliminate the packaging waste that comes with purchasing pre-made boxes, which often arrive wrapped in plastic and packed with additional shipping materials.
Starting your DIY gift box journey requires surprisingly few supplies. The essential toolkit consists of items you likely already own, with a few specialty tools that make the process faster and more precise.
Core Materials:
Cardstock forms the foundation of most paper gift boxes. This heavyweight paper provides the structure and durability needed for boxes that hold their shape and protect contents. Standard printer paper is too flimsy for box-making, while true cardboard is too thick to fold cleanly. Cardstock strikes the perfect balance.
Adhesive options include double-sided tape, liquid glue, glue sticks, and glue dots. Double-sided tape offers the cleanest finish and strongest hold for box assembly. Scor-Tape, a specialty product designed for paper crafting, provides particularly reliable adhesion along box seams and tabs.
Decorative elements transform basic boxes into personalized gifts. Ribbon, twine, washi tape, stamps, stickers, and embellishments allow endless customization. Keep a selection on hand to match different occasions and color schemes.
Essential Tools:
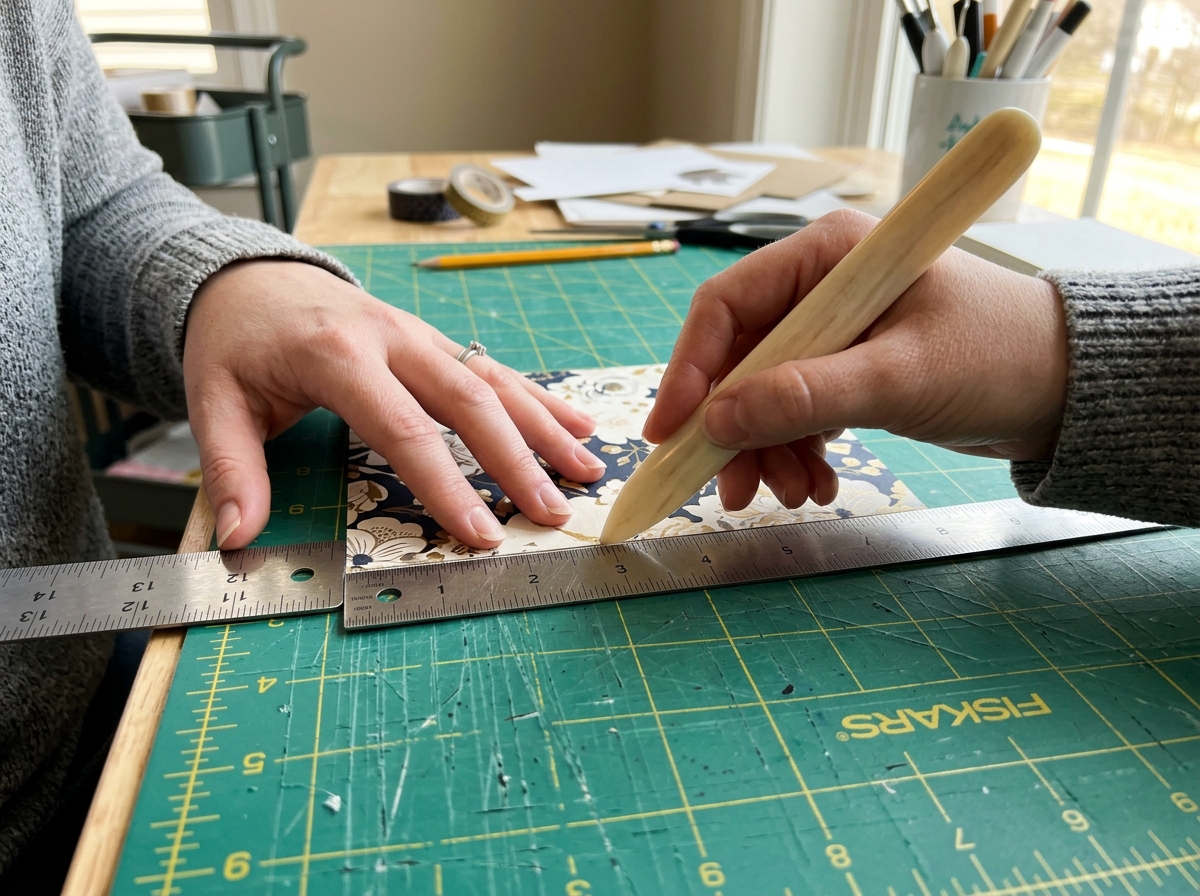
A ruler or straight edge ensures accurate measurements and clean folds. Metal rulers work best because they won't warp or chip along the edge. A scoring tool creates crisp fold lines in cardstock. Professional bone folders are ideal, but you can achieve good results with a dull butter knife, the edge of a ruler, or even a dried-up ballpoint pen. The goal is to compress the paper fibers along the fold line without cutting through.
Sharp scissors or a craft knife enable precise cutting. For repeated projects or intricate designs, a paper trimmer with a scoring blade attachment speeds up the process considerably. A cutting mat protects your work surface when using craft knives and provides a self-healing surface that won't dull blades.
Optional but Helpful:
A scoring board combines measurement guides with built-in scoring channels, making it easy to score multiple boxes consistently. These tools pay for themselves quickly if you plan to make boxes regularly. Die-cutting machines like Cricut or Sizzix can cut complex box templates from digital files, eliminating the need for manual measuring and cutting entirely. While these represent a significant investment, they're valuable for small businesses or serious crafters.
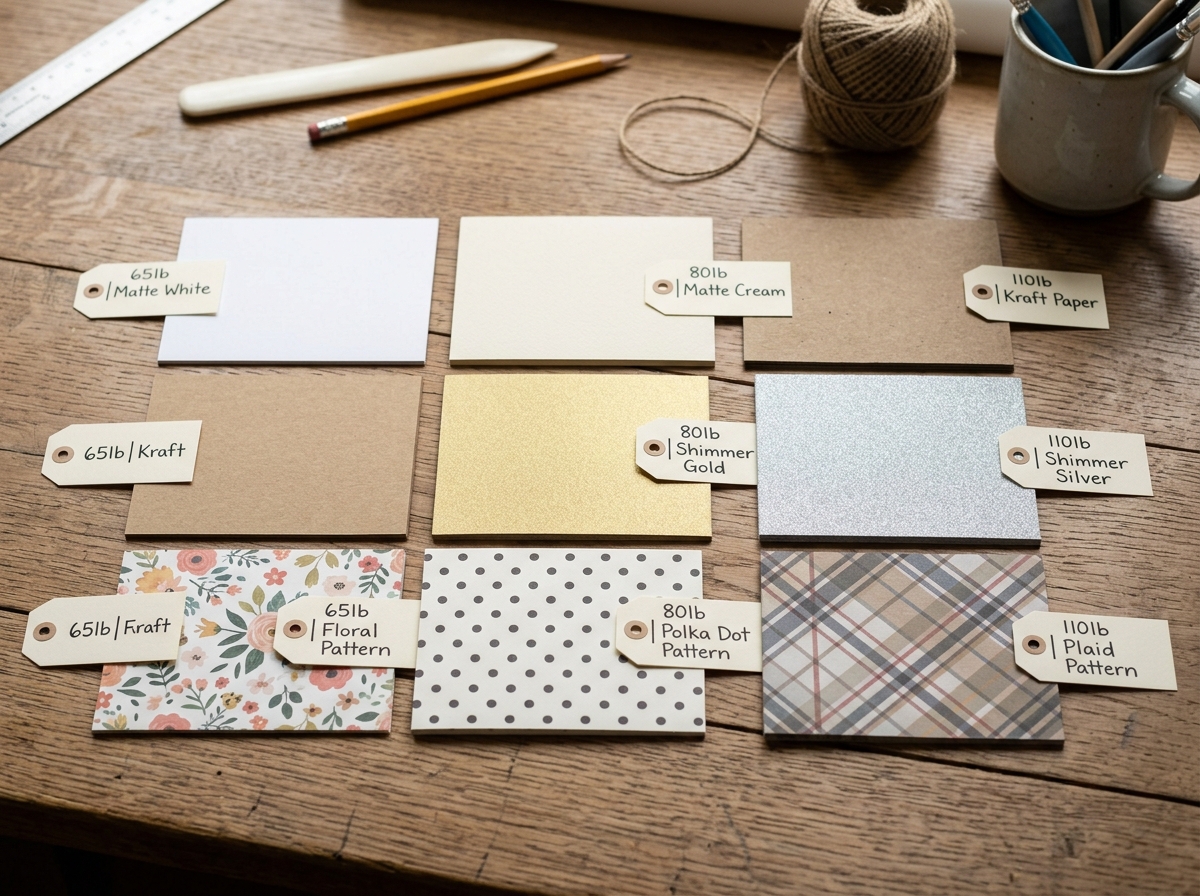
Cardstock weight directly impacts your box's structural integrity and appearance. Paper weight is measured in pounds (lb) or grams per square meter (GSM), with higher numbers indicating thicker, heavier paper. Understanding these specifications helps you select appropriate materials for different box sizes and purposes.
65 lb (176 GSM) Cardstock: This lightweight option works well for small, flat boxes that won't bear much weight. Pillow boxes, envelope-style boxes, and small favor boxes for lightweight items like jewelry or candy work nicely with 65 lb stock. This weight is easy to fold and score, making it beginner-friendly, but it lacks the rigidity for larger or heavier projects.
80 lb (216 GSM) Cardstock: The most versatile weight for DIY gift boxes, 80 lb cardstock provides good structure while remaining easy to fold and manipulate. This weight suits boxes up to about 4×4×4 inches and can hold moderate weight without sagging. Most craft stores stock 80 lb cardstock in a wide range of colors and patterns, making it readily accessible. For wedding favor boxes and party gifts, 80 lb stock offers the sweet spot between durability and workability.
110 lb (300 GSM) Cardstock: Heavy-duty boxes that need to hold substantial weight or maintain their shape during shipping require 110 lb cardstock or heavier. This weight suits larger boxes, gift card holders that need to feel substantial, and boxes that will be handled frequently. The thickness makes scoring critical—without proper scoring, heavy cardstock will crack along fold lines rather than creasing cleanly.
Specialty Papers:
Kraft cardstock provides a natural, rustic aesthetic that's particularly popular for eco-conscious brands and casual occasions. The brown color hides minor imperfections and pairs beautifully with twine, stamps, and minimal embellishments. Shimmer and metallic cardstock add elegance to wedding favors and formal gift boxes. These papers typically run 80-84 lb and include a coating that creates a subtle sheen without metallic particles.
Patterned scrapbook paper offers endless design options but usually comes in lighter weights (60-80 lb). For structural integrity, consider using patterned paper as a decorative layer over plain cardstock, or reserve patterned stock for smaller boxes and decorative elements rather than the main box structure.
Textured cardstock, including linen, canvas, and felt finishes, adds tactile interest. These papers typically perform similarly to their smooth counterparts of the same weight but may be slightly more forgiving of scoring imperfections since the texture camouflages small irregularities.
Paper Selection Guidelines:
For boxes under 3 inches in any dimension, 65-80 lb cardstock suffices. Boxes between 3-5 inches work best with 80-100 lb stock. Larger boxes or those holding more than a few ounces require 110 lb cardstock or consideration of ready-made boxes for better structural support. When in doubt, test with the lighter weight first—you can always move up if the box feels too flimsy.
Mastering a few fundamental techniques elevates your box-making from frustrating trial-and-error to confident creation. These skills apply across virtually all paper box designs, from simple cubes to complex multi-piece constructions.
Scoring for Clean Folds:
Scoring compresses paper fibers along a line, creating a hinge that folds cleanly and precisely. Without scoring, cardstock tends to buckle, crack, or fold unevenly. To score effectively, place your ruler along the fold line and run your scoring tool firmly along the ruler's edge. Apply enough pressure to create a visible indentation without cutting through the paper. The scored line should appear as a slight valley on the side you scored.
Always score on the inside of the fold—the side that will be concave when folded. This prevents the paper surface from cracking and ensures crisp, professional-looking edges. For very heavy cardstock, score from both sides along the same line for easier folding.
Measuring and Marking:
Accuracy in measurement determines whether your box assembles properly. Use a sharp pencil to mark measurements lightly on the back side of your cardstock where marks won't show on the finished box. For repeated projects, create a template from scrap cardstock or cardboard that you can trace rather than measuring each time.
When working with templates—whether printed or traced—ensure your printer hasn't scaled the image. Print a test page and measure the template against the stated dimensions before cutting expensive cardstock. Many printers default to "fit to page" settings that shrink designs by 5-10%.
Cutting Techniques:
Clean cuts are non-negotiable for professional-looking boxes. When using scissors, cut in long, smooth strokes rather than short snips that create jagged edges. For straight lines, a paper trimmer produces more consistent results than scissors. When using a craft knife, make multiple light passes rather than trying to cut through in one heavy stroke. This prevents the blade from wandering and gives you better control, especially around corners.
Assembly Order:
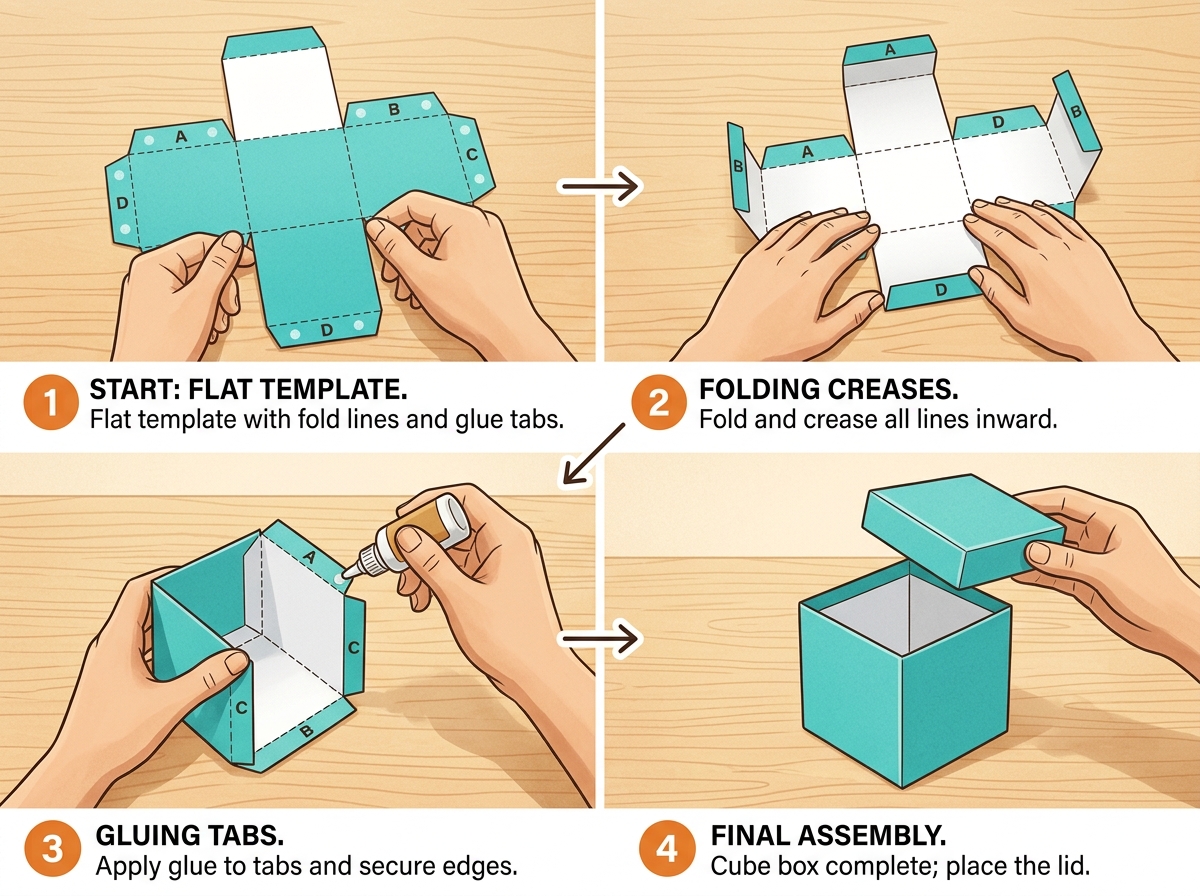
Most boxes assemble more easily when you follow a logical sequence. Typically, this means folding all score lines first, then making any necessary cuts (like slits for tabs), then applying adhesive and assembling one section at a time. Working methodically prevents mistakes and ensures tabs fold in the right direction.
When gluing, apply adhesive to tabs rather than the surfaces they'll attach to—this gives you better control and keeps excess glue from squeezing out onto visible surfaces. Hold each glued joint for 10-15 seconds to allow the adhesive to set before moving to the next section.
The Grain Direction Principle:
Paper has a grain direction—the alignment of fibers during manufacturing. Folding with the grain produces cleaner creases than folding against it. To find grain direction, gently bend (don't crease) the paper in both directions. The direction that bends more easily is with the grain. When possible, orient your box template so major folds run with the grain.
These foundational tutorials cover the most versatile box styles. Once you master these basics, you can adapt dimensions and proportions to create boxes for any need. For more detailed guidance on specific techniques, explore our How to Make a Gift Box from Cardstock (Step-by-Step)">complete cardstock box tutorial.
Classic Cube Box with Lid:
This two-piece design consists of a box base and a slightly larger lid that fits over the top. It's ideal for jewelry, small gifts, and party favors. Start with two 8.5×8.5-inch squares of 80 lb cardstock for a finished box measuring approximately 2.75 inches square.
For the base, score lines 2 inches from each edge, creating a grid of nine squares. Cut along the score lines from each corner to the first intersection, creating four flaps. Fold all score lines, then fold up the sides. Apply glue to the outside of each corner flap and press against the inside of the adjacent wall. Hold until secure.
For the lid, use the same process but start with a square that's 0.25 inches larger in each dimension (8.75×8.75 inches) and score 2 inches from each edge. This creates a lid that fits snugly over the base without being too loose or too tight. The extra quarter-inch accounts for the paper thickness.
Simple Rectangle Box:
Rectangle boxes accommodate gifts that don't fit cube proportions. Using a 12×12-inch sheet of cardstock, score lines 1.5 inches from all four edges. Along one 12-inch side, score additional lines at 5.25 inches and 6.75 inches from the edge. Cut slits along each score line on the 12-inch sides, stopping at the first horizontal score line. Fold all score lines, then fold up the sides. Glue the corner tabs to the inside of the adjacent walls. The resulting box measures approximately 9 inches long by 4.5 inches wide by 1.5 inches deep.
This design scales easily—adjust the measurements proportionally for different sizes while maintaining the 1.5-inch side depth (or change the depth to suit your needs). If you're looking for ready-made options to customize, consider starting with a Small Gift Box Ideas for Jewelry, Treats & Party Favors">pre-made small gift box as your base.
Pillow Box:
Pillow boxes offer an elegant curved shape that's surprisingly simple to create. These work beautifully for lightweight gifts like jewelry, gift cards, or small treats. The distinctive shape comes from curved cuts at each end rather than complex folding. Our dedicated pillow box tutorial walks through multiple size variations and closure options.
Origami-Style Boxes:
Traditional origami boxes require no glue or tape—they hold together through clever folding alone. While these boxes won't withstand rough handling, they're perfect for lightweight gifts and create stunning presentations with decorative paper. The most popular origami box style, the masu box, creates a perfect cube from a single square of paper. For detailed folding instructions and no-glue techniques, see our guide to origami gift boxes.
Tailoring your DIY gift boxes to specific occasions elevates them from simple containers to integral parts of the gift experience. The right colors, patterns, and embellishments transform a basic box into a thoughtful, occasion-appropriate package.
Holiday Gift Boxes:
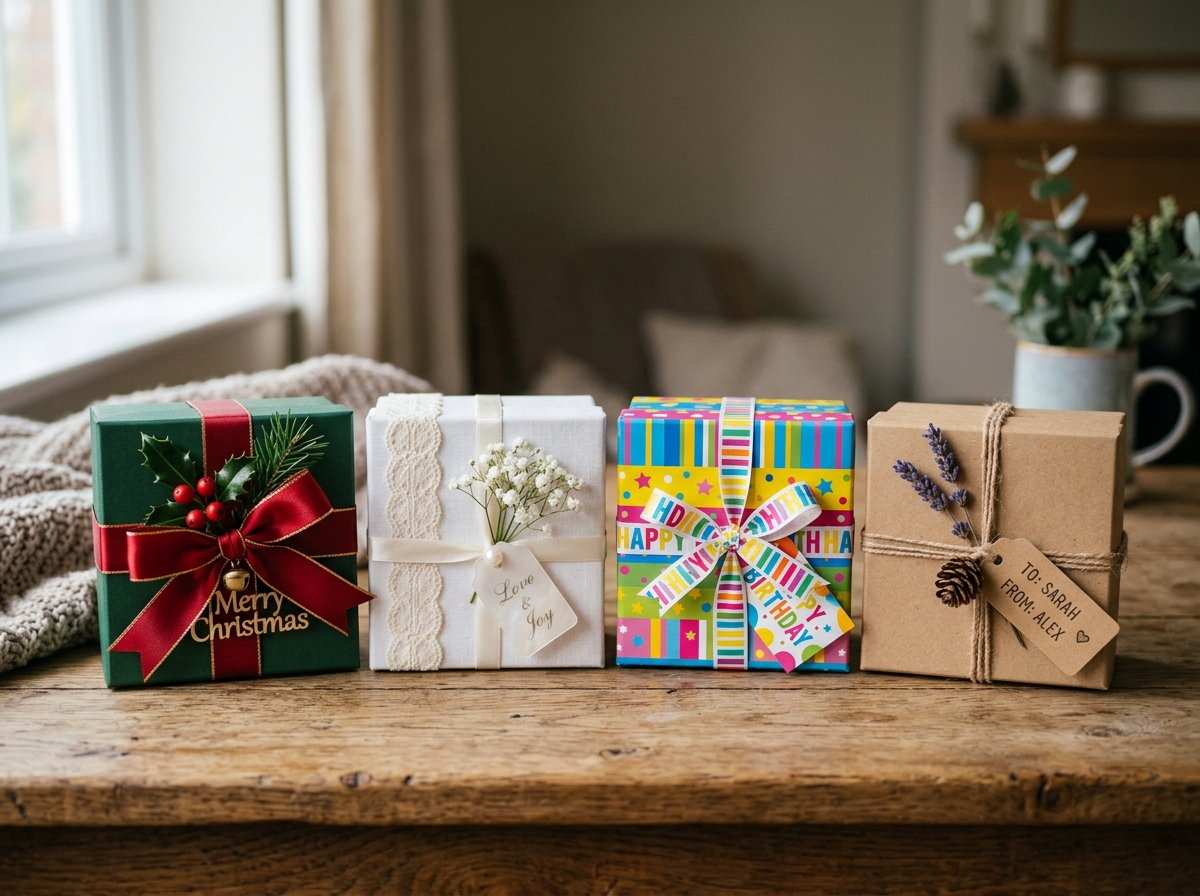
Christmas gift boxes benefit from traditional red, green, gold, and silver color schemes. Kraft boxes decorated with stamps, stencils, or hand-drawn designs offer a rustic, homespun aesthetic that complements the holiday season. For a modern approach, try geometric patterns in non-traditional colors like navy, white, and copper. Add dimension with layered paper snowflakes, miniature ornaments, or sprigs of artificial greenery tucked under ribbon. Our DIY Christmas Gift Boxes: Holiday Packaging Ideas">Christmas gift box guide includes templates and decoration ideas specifically designed for holiday gifting.
Valentine's Day calls for pink, red, and white boxes embellished with hearts, doilies, or romantic patterns. Consider transparent cellophane windows that reveal treats inside, or create heart-shaped boxes using modified templates. Easter boxes work beautifully in pastel shades with grass-textured paper, bunny motifs, or egg-shaped designs.
Wedding and Shower Favors:
Wedding favor boxes require a delicate balance—elegant enough to complement your wedding aesthetic while remaining cost-effective when produced in quantity. White, ivory, and champagne-colored boxes provide classic sophistication. Personalize with custom stamps showing your names and wedding date, or attach small tags with thank-you messages. For detailed guidance on both DIY and hybrid approaches, explore our Wedding Gift Box Ideas: DIY & Ready-Made Options">wedding gift box resource.
Bridal shower and baby shower favors allow more playful designs. Pastel colors, polka dots, and themed embellishments suit these celebrations. Consider box shapes that reflect the occasion—baby bottle shapes for baby showers, or dress-shaped boxes for bridal events.
Birthday Packaging:
Birthday gift boxes offer maximum creative freedom. Match colors to the recipient's favorites or the party theme. For children's birthdays, character-themed paper or bright primary colors work well. Adult birthday boxes can be more sophisticated, using metallic accents, elegant patterns, or minimalist designs. Add a personal touch with the recipient's age incorporated into the decoration, or create a series of small boxes for a "countdown" gift presentation. Find more personalization ideas in our birthday gift box guide.
Seasonal Celebrations:
Graduation, Teacher Appreciation Week, Mother's Day, and Father's Day each present unique packaging opportunities. School colors work perfectly for graduation gifts. Teacher appreciation boxes might incorporate apple motifs, book patterns, or pencil decorations. Mother's Day and Father's Day boxes benefit from sophisticated, understated designs that feel grown-up and special.
A plain cardstock box serves its functional purpose, but decoration transforms it into something memorable. The key is choosing embellishments that enhance rather than overwhelm your design.
Ribbon and Twine:
Classic ribbon remains the most versatile box decoration. Satin ribbon offers elegant sheen for formal occasions, while grosgrain provides texture and holds knots more securely. For a rustic look, jute twine or baker's twine (the red-and-white or blue-and-white twisted cord) pairs beautifully with kraft boxes. Wrap ribbon around the box horizontally and vertically, tying a bow on top, or create a simple band around the middle with the bow offset to one side.
Stamps and Ink:
Rubber stamps allow you to add custom designs, monograms, or messages without artistic skill. Choose permanent ink for glossy or coated papers, and pigment or dye ink for uncoated cardstock. Create patterns by repeatedly stamping a small design across the box surface, or add a single focal stamp on the lid. For a personalized touch, custom stamps with names, dates, or logos are available from online stamp makers at reasonable prices.
Washi Tape and Decorative Tape:
Washi tape serves both decorative and functional purposes. Use it to seal box edges, create striped patterns, or add pops of color and pattern to plain boxes. Because washi tape is repositionable and tears easily by hand, it's particularly beginner-friendly. Layer different patterns and widths for visual interest.
Paper Embellishments:
Die-cut shapes, paper flowers, and layered elements add dimension. Attach these with foam adhesive squares for a raised, 3D effect. Doilies, both paper and fabric, create vintage-inspired details. For modern aesthetics, geometric paper shapes in contrasting colors provide graphic impact.
Tags and Labels:
Gift tags serve the practical purpose of identifying the recipient while adding decorative interest. Create matching tags from the same cardstock as your box, or choose contrasting colors for visual pop. Print labels on your home printer for a polished, professional look, or hand-letter tags for a personal touch. Attach tags with ribbon, twine, or small safety pins.
Natural Elements:
Sprigs of dried lavender, small pinecones, cinnamon sticks, or fresh greenery bring organic texture to gift boxes. These work particularly well with kraft or earth-toned boxes for a natural, garden-inspired aesthetic. Secure natural elements under ribbon or with small dots of hot glue.
Personalization Techniques:
Hand-lettering recipient names directly on boxes creates an intimate, custom feel. If your handwriting isn't your strong suit, print names on coordinating paper and glue them to the box as labels. For repeated projects like wedding favors, consider having custom stickers printed with names, dates, or thank-you messages. Monogram stamps offer an elegant middle ground between fully custom and generic.
Even experienced crafters encounter occasional box-making challenges. Understanding common problems and their solutions saves time, materials, and frustration.
Warping and Buckling:
Boxes that warp or buckle usually suffer from insufficient scoring or uneven folding. If your cardstock buckles when you fold it, you're either using paper that's too heavy for the box size or not scoring deeply enough. Try increasing pressure when scoring, or switch to a lighter weight cardstock. Warping can also result from humidity—store cardstock in a cool, dry place and avoid working in very humid conditions.
Lids That Don't Fit:
The most common complaint with two-piece boxes is lids that are too tight or too loose. For a proper fit, the lid must be slightly larger than the base—typically 0.125 to 0.25 inches larger in each dimension, depending on cardstock thickness. Heavier cardstock requires more clearance. If your lid is too tight, don't force it—this will crease and damage both pieces. Instead, make a new lid with dimensions increased by 0.125 inches. If the lid is too loose, add a decorative band of cardstock around the base to increase its external dimensions slightly.
Weak Corners:
Corners that don't hold or that pull apart indicate insufficient adhesive or improper tab placement. Use enough glue or tape to create a strong bond, but avoid excess that squeezes out and creates a mess. Double-sided tape provides stronger holds than liquid glue for most box assembly. Ensure tabs overlap properly—they should sit flush against the inside wall, not at an angle.
Cracked Fold Lines:
Cracks along fold lines occur when heavy cardstock is folded without adequate scoring, or when you score on the wrong side of the fold. Remember to score on the inside of each fold. For very heavy cardstock, score twice along the same line to compress fibers more deeply. If cracks do appear, they're usually on the outside of the fold—cover them with decorative tape or ribbon.
Uneven Sides:
Boxes with sides that don't align properly result from inaccurate measuring or cutting. Use a ruler and sharp pencil to mark measurements precisely, and cut carefully along marked lines. A paper trimmer produces more consistent cuts than scissors for straight edges. When following templates, ensure your printer hasn't scaled the design—always measure the printed template against stated dimensions before cutting.
Adhesive Showing:
Visible glue or tape detracts from a professional finish. Apply adhesive sparingly and only to surfaces that will be hidden. Double-sided tape eliminates visible adhesive entirely. If using liquid glue, apply it in a thin, even layer and wipe away any excess immediately with a damp cloth. For tabs that will be visible, consider using decorative washi tape instead of clear tape—it becomes part of the design rather than something to hide.
Packaging homemade cookies, candies, or other edible gifts requires attention to food safety that goes beyond aesthetic concerns. While DIY gift boxes create beautiful presentations, not all papers and adhesives are appropriate for direct food contact.
Food-Safe Paper Standards:
Not all cardstock is food-safe. Paper intended for direct food contact should meet FDA standards for food-grade materials. Most plain, uncoated cardstock from reputable paper suppliers is generally safe for dry foods, but heavily dyed, metallic, or coated papers may contain substances that shouldn't contact food directly. When in doubt, use a barrier between food and decorative packaging.
Barrier Solutions:
The safest approach for edible gifts is using a barrier between food and decorative packaging. Place cookies, candies, or baked goods in food-grade cellophane bags, wax paper bags, or parchment paper before placing them in your decorated cardstock box. This protects food from any questionable materials in the decorative packaging while allowing you to use any paper you like for the outer box. Clear cellophane bags have the added benefit of displaying your treats attractively.
For cookies and brownies, individually wrap items in food-grade cellophane or place them in small glassine bags before boxing. Candies can be placed in paper or foil candy cups, then arranged in the box. This approach also keeps items fresh longer by providing an additional moisture barrier.
Grease and Moisture Concerns:
Cardstock absorbs grease and moisture, which can compromise box structure and appearance. Oily cookies or moist baked goods will eventually stain through most paper packaging. Using cellophane or wax paper liners prevents this issue. For particularly moist items, consider using boxes as outer packaging with a food-grade plastic container inside, or choose ready-made bakery boxes designed specifically for food products.
Adhesive Considerations:
Keep all adhesives away from food contact surfaces. Glue, tape, and decorative elements should be on the exterior of the box only, never touching food directly. If using boxes with interior adhesive (like glue on tabs), ensure the food is wrapped in a protective barrier before placing it in the box.
Shelf Life and Freshness:
Paper boxes don't provide airtight seals, so they're not suitable for long-term food storage. Use DIY boxes for gifts that will be consumed within a few days. For items that need to stay fresh longer, place them in airtight containers or bags before boxing, or choose packaging specifically designed for food storage.
Labeling Requirements:
If you're selling baked goods or candies packaged in DIY boxes, you may be subject to cottage food laws that require ingredient labels, allergen warnings, and other information. Check your local regulations before selling food in any packaging, homemade or otherwise. Even for gifts, it's considerate to include a list of ingredients, especially for recipients with food allergies.
The decision between making boxes from scratch and purchasing ready-made options isn't always straightforward. Several factors influence which approach makes the most sense for your specific situation.
Cost Comparison:
For small quantities (under 10 boxes), DIY and ready-made options cost roughly the same when you factor in materials, tools, and time. A sheet of quality 12×12-inch cardstock costs $0.50-$1.00 and yields one box. A comparable ready-made box typically costs $1.00-$3.00 depending on size and quality. However, the cost equation shifts significantly with quantity.
For 50-100 boxes, DIY becomes more economical as you can purchase cardstock in bulk at lower per-sheet prices. Beyond 100 boxes, wholesale ready-made boxes often become competitive again because manufacturers achieve economies of scale that individual crafters cannot match. For wedding favors requiring 150 boxes, compare bulk cardstock prices against wholesale box suppliers before committing to either approach.
Time Investment:
Making a single box from scratch takes 10-20 minutes once you're familiar with the process. Making 50 boxes represents 8-16 hours of work—a significant time commitment. If you're planning a large-scale project, honestly assess whether you have the time and whether you'll enjoy the process. Some people find box-making meditative and relaxing; others find it tedious.
Ready-made boxes require only decoration time, which typically takes 2-5 minutes per box depending on complexity. For projects requiring many boxes, consider a hybrid approach: purchase plain ready-made boxes and personalize them with stamps, ribbon, or other embellishments. This gives you custom results without the full time investment of making boxes from scratch.
Skill and Equipment Considerations:
DIY box-making has a learning curve. Your first few boxes will likely take longer and may not turn out perfectly. If you need boxes for an event next week and you've never made boxes before, ready-made options reduce stress and ensure consistent results. However, if you have time to practice and you enjoy learning new skills, DIY offers satisfaction beyond the finished product.
Specialized equipment like scoring boards or die-cutting machines makes DIY more efficient but requires upfront investment. If you don't already own these tools and don't plan to make boxes regularly, the equipment cost tilts the equation toward ready-made boxes.
Size and Shape Flexibility:
DIY excels when you need unusual sizes or shapes not readily available in stores. If your gift is an odd dimension, making a custom-sized box ensures a perfect fit. Ready-made boxes come in standard sizes—if your item fits one of those sizes well, ready-made is simpler. For truly custom shapes like hexagons, triangles, or specialty designs, DIY or custom ordering are your only options.
Structural Requirements:
For heavy items or boxes that need to withstand shipping, professionally manufactured boxes typically offer superior structural integrity. Corrugated cardboard boxes, rigid setup boxes, and other commercial packaging use materials and construction techniques that are difficult to replicate with DIY methods. If your box needs to protect fragile items or survive postal handling, invest in appropriate ready-made packaging.
Branding and Professional Image:
Small business owners must consider how packaging reflects on their brand. DIY packaging can look charmingly handmade or disappointingly amateur, depending on execution. If your brand emphasizes handcrafted, artisanal qualities, well-executed DIY packaging reinforces that message. If your brand positioning is more polished and professional, custom-printed ready-made boxes may serve you better. Our guide to gift box packaging for small businesses explores these considerations in depth.
For entrepreneurs selling handmade goods, baked items, or small products, packaging serves multiple functions beyond simply containing the product. It protects items during shipping, communicates brand identity, and creates the memorable unboxing experience that encourages repeat purchases and social media sharing.
Branding Through Packaging:
Consistent packaging becomes part of your brand identity. Choose colors, materials, and styles that align with your overall brand aesthetic and use them consistently across all orders. A candle maker might always use kraft boxes with simple black-and-white labels and natural twine, creating instant brand recognition. A jewelry designer might use white boxes with colored tissue paper and custom logo stickers.
Custom stamps offer an affordable way to add your logo or business name to boxes. For under $30, you can have a custom stamp made that you'll use hundreds of times. Stamp boxes, tissue paper, or tags to create a cohesive branded look without the expense of custom-printed packaging.
Wholesale Sourcing for Volume:
Once your business reaches consistent sales volume, wholesale packaging suppliers offer better per-unit costs than retail craft stores. Many wholesale suppliers have minimum order quantities (MOQs), typically 50-100 units, but the savings justify the larger purchase for businesses with steady sales. Buying in bulk also ensures you always have packaging on hand and reduces the per-order cost that factors into your pricing.
When sourcing wholesale, request samples before committing to large orders. Box dimensions, cardstock weight, and color can vary between suppliers, and you want to ensure the quality meets your standards before purchasing hundreds of units.
Balancing Cost and Presentation:
Packaging costs must be factored into product pricing, but over-spending on packaging can make your products uncompetitive. A general guideline is keeping packaging costs to 5-10% of your product's retail price. A $30 item can justify $1.50-$3.00 in packaging costs, while a $10 item needs packaging under $1.00 to maintain healthy margins.
Look for efficiencies that reduce costs without sacrificing quality. Buying cardstock in bulk, using simple decorations like twine instead of expensive ribbon, or choosing ready-made boxes in standard sizes all help control costs. The goal is packaging that looks professional and protects your product without eating into your profits.
Shipping Considerations:
Gift boxes used as product packaging must fit inside shipping boxes or mailers with adequate protection. Factor in the size of your gift box when selecting shipping materials—you want enough room for cushioning material without excessive empty space that increases shipping costs. Dimensional weight pricing from carriers means oversized packages cost more to ship even if they're lightweight.
For fragile items, the decorative gift box serves as secondary packaging inside a sturdy shipping container. Don't rely on a cardstock gift box to protect breakable items during shipping—it's not designed for that purpose.
Seasonal and Limited Edition Packaging:
Changing packaging seasonally or offering limited edition designs creates excitement and gives customers a reason to order during specific periods. Holiday packaging, anniversary editions, or seasonal colors make your products feel special and timely. This strategy works particularly well for businesses with gift-focused products.
Plan seasonal packaging changes in advance and order supplies with enough lead time. Many wholesale suppliers have longer lead times during busy seasons, so order holiday packaging by late summer to ensure availability.
Sustainability and Customer Values:
Many customers increasingly value sustainable packaging. Using recycled cardstock, minimizing plastic components, and choosing packaging that customers can recycle or reuse aligns with these values. Communicate your sustainable packaging choices on your website and social media—it's a selling point worth promoting. For businesses focused on eco-conscious branding, kraft boxes, minimal embellishments, and recyclable materials reinforce your environmental commitment.
Consider including a note with orders explaining your packaging choices and how customers can recycle or repurpose the materials. This educates customers and demonstrates your commitment to sustainability beyond just marketing claims.
An organized supply system makes box-making faster and more enjoyable. When materials are easy to find and in good condition, you're more likely to actually use them rather than abandoning projects in frustration.
Cardstock Storage:
Store cardstock flat to prevent warping and creasing. Large flat file cabinets or portfolio cases work ideally, but these can be expensive. More affordable options include storing cardstock in the original packaging, in large zippered bags, or in document boxes designed for 12×12-inch scrapbook paper. Keep cardstock in a cool, dry location away from humidity, which causes warping and makes paper difficult to work with.
Organize cardstock by color or by weight, depending on which system makes more sense for how you work. Label storage containers clearly so you can find what you need quickly. For businesses making boxes regularly, consider a simple inventory system tracking how many sheets of each color you have on hand to avoid running out mid-project.
Tool Organization:
Keep frequently used tools in a dedicated container or drawer. A simple plastic caddy, pencil case, or drawer organizer keeps scissors, scoring tools, rulers, and adhesives together and easy to grab. Store cutting mats flat or hanging on a wall to prevent warping. Replace blades in craft knives regularly—dull blades require more pressure and produce ragged cuts.
Embellishment Storage:
Ribbon, twine, stamps, and other decorative elements multiply quickly. Store ribbon on a ribbon organizer (available at craft stores) or simply collect spools in a basket or drawer. Keep stamps in their original packaging or in a divided storage case. Small embellishments like buttons, stickers, and paper punches work well in divided plastic containers with multiple compartments.
Take photos of your embellishment storage and keep the photos on your phone. When shopping for new supplies, you can reference what you already own to avoid duplicate purchases and to ensure new items coordinate with existing supplies.
Template and Pattern Organization:
If you use printed templates or have created custom patterns, store them in sheet protectors in a three-ring binder. Label each template with dimensions and notes about what size box it produces. This creates a personal reference library you can consult when starting new projects. For digital templates, organize files in clearly labeled folders on your computer and back them up to cloud storage. For more template resources, check our collection of Free Printable Gift Box Templates (10+ Designs)">free printable gift box templates.
Workspace Setup:
A dedicated workspace, even if it's just a corner of a table, makes box-making more efficient. Ideally, you want a flat, clean surface with good lighting and easy access to tools and materials. A self-healing cutting mat protects the work surface and provides a marked grid for measuring. Keep a trash bin or scrap container nearby for paper scraps—box-making generates considerable waste.
For small businesses making boxes in volume, consider setting up an assembly line process. Cut all boxes one day, score and fold them the next, and decorate them in a third session. This batch processing is more efficient than making boxes one at a time from start to finish.
Scrap Management:
Save larger cardstock scraps for smaller projects. Scraps can become gift tags, small embellishments, or components of other crafts. Store usable scraps sorted by color in labeled envelopes or small boxes. Recycle truly unusable scraps—cardstock is recyclable in most municipal recycling programs.
DIY gift boxes offer a unique intersection of creativity, practicality, and personal expression. Whether you're crafting a single special gift box for a loved one, creating dozens of favors for a celebration, or developing packaging for your small business, the skills and techniques covered in this guide provide a foundation for countless projects.
Start with simple designs and basic materials as you build confidence and skill. A plain kraft box with twine and a handwritten tag can be just as meaningful as an elaborate multi-piece creation—sometimes more so. As you gain experience, experiment with different papers, techniques, and embellishments to develop your personal style.
Remember that the goal isn't perfection but thoughtfulness. Handmade packaging communicates care and effort in ways that store-bought alternatives cannot match. Each box you create carries a piece of your creativity and attention, making the gift inside even more special.
For businesses, packaging represents an opportunity to extend your brand into every customer interaction. Thoughtfully designed boxes create memorable experiences that build customer loyalty and generate word-of-mouth marketing more effectively than many traditional advertising methods.
The resources linked throughout this guide provide deeper dives into specific techniques, occasions, and applications. Whether you're interested in no-glue origami techniques, surprise explosion boxes, or corporate gifting applications, you'll find detailed tutorials and inspiration to support your box-making journey.
The most important step is simply to start. Gather your materials, choose a simple tutorial, and make your first box. You'll learn more from actually creating boxes than from reading about the process. With each box you make, your skills will improve, your speed will increase, and you'll develop an intuitive understanding of what works for different situations.
Gift boxes transform ordinary items into memorable presentations. They show recipients that you invested time and thought into not just the gift itself but every aspect of the giving experience. In a world of quick purchases and standard packaging, that extra effort stands out and creates lasting impressions. For guidance on selecting the right materials for your projects, explore our comprehensive materials guide.
Whether your next project is a single birthday gift, a wedding with two hundred favors, or launching a product line that needs distinctive packaging, you now have the knowledge to create boxes that are beautiful, functional, and uniquely yours. The possibilities are limited only by your imagination and the papers in your craft drawer.


