Cart
0
You may also like


Book a call with our development team to get started.


Apply online and access wholesale pricing.

Ordering custom packaging for the first time feels like navigating unfamiliar territory. You know you need branded boxes that protect your products and represent your business, but the process—from measuring and selecting materials to submitting artwork and managing lead times—can seem opaque. This guide walks through each step of how to order custom packaging, from initial measurements to receiving your finished boxes, so you can approach your first order with confidence.
Whether you're packaging handmade candles, baked goods, or retail products, understanding the ordering process helps you avoid common pitfalls like missed deadlines, artwork errors, and material mismatches. By the end of this guide, you'll know exactly what information suppliers need, how to prepare print-ready files, and how to plan for production timelines.
Before contacting any packaging supplier, gather three pieces of foundational information: your product dimensions, your quantity requirements, and your timeline. These three data points determine which box styles are feasible, whether you meet minimum order quantities, and if production can align with your launch date.
Start by measuring your product at its widest, longest, and tallest points. Add a quarter-inch to a half-inch of clearance on each dimension to ensure the product fits comfortably without excessive movement. If you're packaging multiple items together, measure the assembled bundle. For irregularly shaped products, measure the bounding box—the smallest rectangular space that contains the entire item.
Next, estimate your order quantity. Most custom packaging suppliers work with minimum order quantities (MOQs) that typically range from 250 to 1,000 units for folded cartons and 500 to 2,500 units for corrugated boxes. Understanding what MOQ means in packaging helps you evaluate whether custom printing fits your budget and storage capacity, or whether you should start with stock boxes and custom labels.
Finally, work backward from your need date. Industry standards suggest that typical production times range from 7 to 21 business days for custom orders, though this varies based on design complexity, material availability, and supplier capacity. Add time for artwork preparation, proof approval, and shipping. A realistic timeline from first contact to boxes in hand is six to eight weeks for a first-time order.
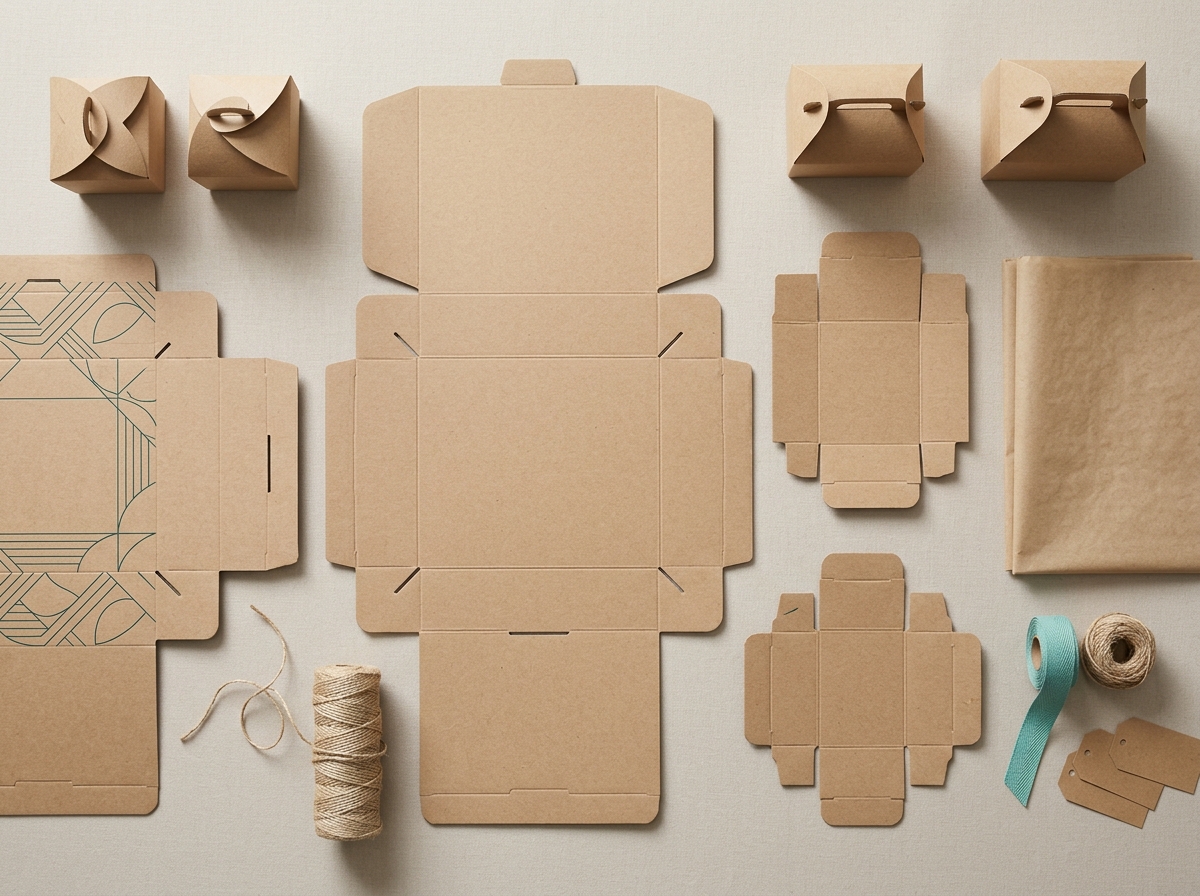
Once you have your product dimensions, you can select a box style that balances function, aesthetics, and cost. The three most common categories for small business packaging are kraft boxes, corrugated boxes, and rigid setup boxes. Each serves different product types and price points.
Kraft boxes are folded cartons made from paperboard, typically ranging from 12-point to 24-point thickness. They ship flat, assemble quickly, and work well for lightweight products under two pounds—think cookies, cosmetics, or small gifts. Kraft boxes for small businesses offer an eco-friendly aesthetic at an accessible price point, with printing available in one to four colors or full CMYK.
Corrugated boxes use fluted cardboard and provide significantly more protection. They're the right choice for products over two pounds, items shipped via parcel carrier, or anything fragile. Corrugated comes in single-wall, double-wall, and triple-wall constructions, with single-wall sufficient for most ecommerce applications. Printing on corrugated is typically limited to one or two colors due to the textured surface, though litho-lamination allows full-color printing at higher minimums.
Rigid setup boxes are pre-glued, non-folding boxes that arrive assembled. They offer a premium unboxing experience and work well for high-value products like jewelry, electronics, or luxury goods. Rigid boxes have higher per-unit costs and larger MOQs, but they communicate quality and can justify higher product pricing. For a detailed comparison of these options, review how to choose custom packaging materials.
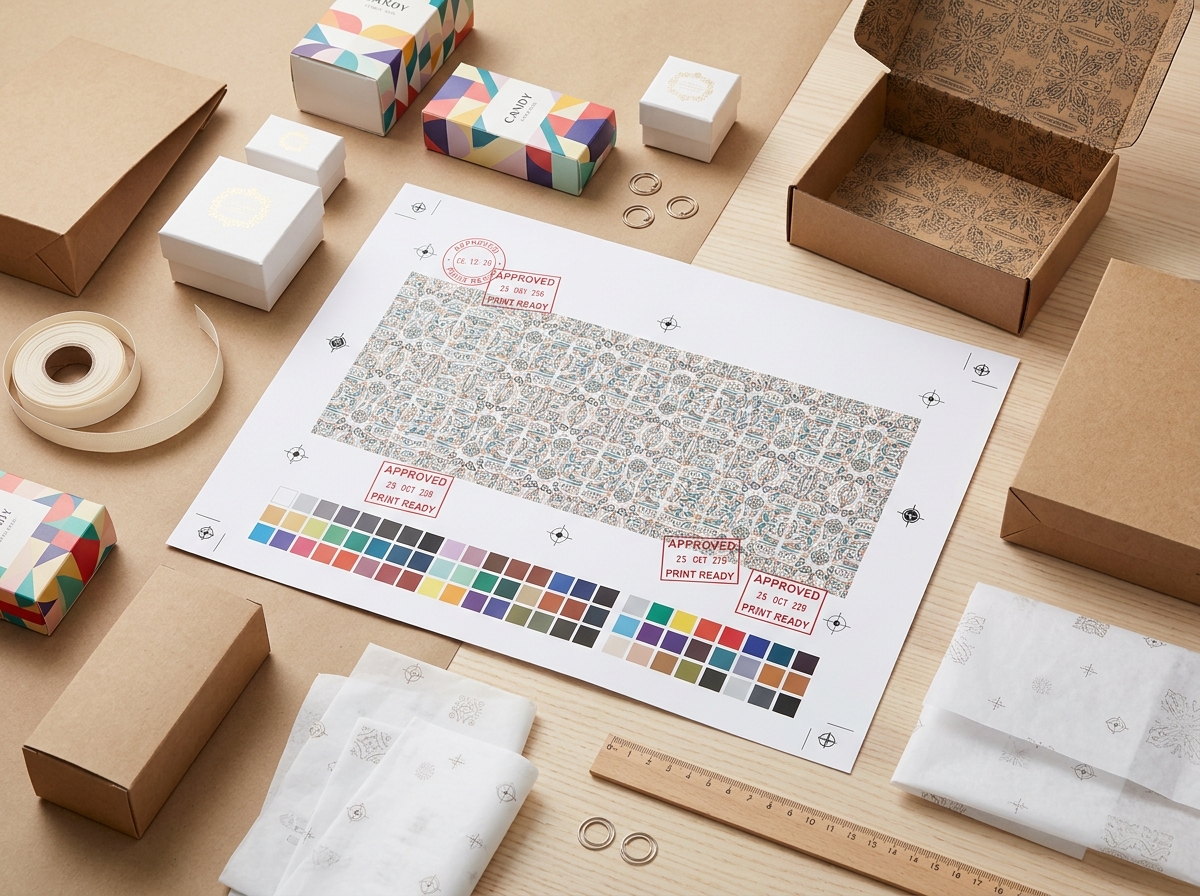
Once you've selected your box style, you'll need to prepare artwork that meets print production standards. Print-ready artwork prevents delays, reduces back-and-forth revisions, and ensures your design prints as intended. Most packaging suppliers require files in specific formats with precise technical specifications.
The preferred file format is Adobe Illustrator (.AI) or high-resolution PDF with fonts converted to outlines. Files should be built in CMYK color mode, not RGB, since packaging uses ink-based printing rather than screen-based color. Images and logos must be at least 300 DPI resolution at final print size—anything lower will appear pixelated or blurry on the finished box.
Your supplier will provide a dieline, which is a template showing the flat layout of the box with fold lines, cut lines, and safe zones marked. Place your artwork on the dieline, ensuring that any design elements intended to reach the edge of the box extend at least 1/8 inch beyond the cut line. This extension, called bleed, prevents white borders if the cutting is slightly off-center. Keep important text and logos at least 1/8 inch inside the cut line to avoid them being trimmed.
If you're working with a designer who hasn't prepared packaging artwork before, share these specifications early. Common errors include using RGB color, placing text too close to fold lines, submitting low-resolution logos, and forgetting to convert fonts to outlines. Each of these issues adds days to your timeline while files are corrected and re-submitted.
For businesses ordering structured gift boxes, ensure your artwork accounts for how the design wraps around corners and transitions across panels. A flat dieline can be deceiving—what looks balanced on screen may appear disjointed when folded into three-dimensional form.
With your specifications and artwork prepared, you're ready to request quotes. Contact at least three suppliers to compare pricing, lead times, and service quality. Provide identical information to each—box dimensions, material type, print colors, quantity, and desired delivery date—so you can make an apples-to-apples comparison.
A complete quote should include the per-unit price, setup fees (for printing plates or dies), shipping costs, and production lead time. Setup fees typically range from $50 to $300 depending on the number of colors and box complexity. These are one-time charges; reorders using the same design don't incur setup fees again.
Pay attention to what's included in the quoted lead time. Some suppliers count from the day you place the order, while others start timing only after artwork is approved and payment is received. Lead time is typically defined as the period from when materials are received and inspected until the finished goods are ready to ship. Clarify this definition upfront to avoid mismatched expectations.
Ask about the supplier's proof process. Digital proofs are standard and show how your design will look, but they don't reveal material texture or color accuracy. Physical samples or press proofs cost extra but provide the most accurate preview, especially important if color matching is critical to your brand.
Also inquire about storage and reorder terms. Some suppliers will warehouse your printing plates and offer streamlined reordering, while others require you to manage files and submit them fresh each time. If you plan to reorder regularly, a supplier with customer portals and stored specifications will save time on subsequent orders.
Once you've selected a supplier, you'll submit your purchase order and final artwork. Most suppliers require a deposit—typically 50 percent—before production begins. Confirm payment terms, accepted methods, and whether net payment terms are available for established accounts.
When submitting artwork, include a PDF proof showing how you expect the final box to look. This reference helps the supplier's prepress team catch discrepancies between your vision and the file structure. If your design includes special finishes like foil stamping, embossing, or spot UV, create separate layers in your artwork file clearly labeled for each finish.
The supplier's prepress department will review your files for technical issues—missing fonts, low-resolution images, incorrect color modes, or artwork positioned outside safe zones. If they find problems, they'll send the file back with notes. Respond quickly to these revision requests; each round of changes adds days to your production timeline.
For businesses creating memorable unboxing experiences, this is the stage to confirm interior printing, tissue paper colors, or insert placement. These details are harder to change once production begins, so get them right during the approval phase.
After your artwork passes prepress review, the supplier will send a digital proof for final approval. This proof shows your design positioned on the dieline with all colors, text, and images as they'll appear when printed. Review it carefully—this is your last opportunity to catch errors before production.
Check spelling, phone numbers, website URLs, and legal text like nutrition facts or ingredient lists. Verify that your logo is positioned correctly and that colors match your brand standards as closely as possible in digital preview. Confirm that barcodes, QR codes, or other scannable elements are placed in flat areas, not across folds where they might not scan reliably.
If you requested a physical sample or press proof, wait for it to arrive before giving final approval. Press proofs are printed on the actual material using the actual printing process, so they reveal texture, color accuracy, and how the box feels in hand. This is especially valuable for rigid boxes or specialty finishes where tactile quality matters.
Once you approve the proof, the supplier will ask you to sign off—usually via email or through their customer portal. This signature confirms that you've reviewed the design and accept responsibility for any errors you didn't catch. After sign-off, changes become expensive or impossible, often requiring you to restart the entire production run.
The proof approval stage is also when you should confirm your delivery address, contact person, and any special shipping instructions. If you're shipping to a fulfillment center or third-party logistics provider, provide their receiving hours and appointment requirements to avoid delivery delays.
After proof approval and deposit payment, your order enters the production queue. Lead times vary based on material type, print method, order volume, and the supplier's current capacity. The lead time for custom packaging typically ranges from 4 to 12 weeks, though many suppliers offer expedited options for rush orders.
For standard folded cartons printed with digital or flexographic printing, expect 10 to 15 business days from approval to shipping. Corrugated boxes often take slightly longer—12 to 18 business days—due to the additional structural considerations and printing limitations. Rigid boxes with custom inserts or specialty finishes can extend to 20 to 25 business days.
Rush production is available from many suppliers at a premium, typically 20 to 30 percent above standard pricing. Express options can reduce lead time to as little as 15 working days, though this depends on the supplier's current capacity and whether they have your material in stock. Rush fees prioritize your order in the production queue but don't eliminate the physical time required for printing, cutting, folding, and quality checks.
Several factors can extend lead times beyond the initial estimate. Material shortages or backorders add days or weeks, especially for specialty papers or custom colors. Complex designs with multiple finishes require additional press setup and curing time. High-volume orders may need to be split across multiple production runs. And supplier capacity fluctuations—particularly during peak seasons like October through December—can push timelines out even for standard orders.
Plan for the unexpected by building buffer time into your launch schedule. If you need packaging by a specific date, order at least two weeks earlier than the quoted lead time suggests. This cushion absorbs minor delays without derailing your product launch or leaving you scrambling for temporary alternatives.
When your packaging arrives, inspect it immediately while the delivery driver is still present if possible. Check the box count against your purchase order, look for visible damage to the shipping cartons, and note any discrepancies on the delivery receipt. Most carriers require damage claims to be filed within 24 to 48 hours.
Open several cartons and examine the boxes for print quality, color accuracy, structural integrity, and adherence to your approved proof. Check that all panels are present, that scoring and perforations are clean, and that the boxes fold and close as expected. If you ordered multiple SKUs or designs, verify that quantities match your order breakdown.
Conduct a test pack with actual products. Assemble a box, load your product, close it, and simulate the handling it will experience during storage and shipping. This real-world test often reveals issues that aren't apparent when examining empty boxes—tight fits, weak closures, or artwork that looks different when the box is assembled versus flat.
If you find defects or discrepancies, document them with photos and contact your supplier immediately. Most packaging suppliers stand behind their work and will reprint orders that don't meet approved specifications, but you must report issues promptly. Waiting weeks to mention a problem makes it difficult to determine whether the issue existed at delivery or occurred during your storage and handling.
For businesses ordering specialty display packaging, pay particular attention to clarity, closure mechanisms, and how products sit inside the package. These functional elements are harder to assess from proofs and often require physical inspection to validate.
After successfully receiving your first order, establish a reorder strategy before you run low on inventory. Track your usage rate—how many boxes you use per week or month—and calculate your reorder point. This is the inventory level that triggers a new order, accounting for lead time plus a safety buffer.
For example, if you use 100 boxes per week and lead time is four weeks, your reorder point is 400 boxes plus a safety buffer of perhaps 100 boxes, for a total reorder trigger of 500 boxes. When your inventory drops to 500 units, place your next order. This system prevents stockouts while avoiding excessive inventory carrying costs.
Reorders are typically faster and cheaper than initial orders. Setup fees don't apply since your printing plates are already made, and the supplier has your specifications on file. Lead times may be shorter because there's no artwork approval phase. Some suppliers offer standing orders or scheduled deliveries, automatically producing and shipping boxes on a regular cadence.
Review your packaging periodically to ensure it still serves your needs. As your business grows, you may need different quantities, sizes, or materials. Design refreshes keep your brand current and can improve functionality based on customer feedback. However, balance the desire for updates against the cost of new setup fees and the risk of having obsolete inventory if you change designs too frequently.
Consider how your custom packaging costs fit into your overall product pricing strategy. Packaging is a marketing expense as much as a functional one, and investing in quality boxes can support premium positioning and reduce returns from damage.
First-time buyers often make predictable mistakes that add cost, delay timelines, or result in packaging that doesn't meet expectations. Being aware of these pitfalls helps you avoid them.
One common error is underestimating lead times. Suppliers quote production time, but total time from initial contact to delivery includes artwork preparation, quote review, proof approval, payment processing, production, and shipping. Add these stages together and build in buffer time. Rushing any step increases error risk.
Another mistake is ordering the minimum quantity to save money without considering storage and reorder logistics. If your MOQ is 500 units but you use 200 per month, you'll reorder every two and a half months—incurring setup fees and managing frequent deliveries. Sometimes ordering a larger quantity with a longer reorder cycle is more cost-effective despite higher upfront investment.
Skipping the physical sample is a risk many first-time buyers take to save time or money. Digital proofs don't reveal material weight, color accuracy, or structural issues. Investing in a physical sample before committing to a full production run can prevent expensive reprints.
Failing to account for product variations also causes problems. If you package items in multiple sizes or colors, ensure your box dimensions accommodate the largest variant with appropriate inserts or padding for smaller ones. Ordering different box sizes for each product variant multiplies your SKU complexity and inventory management burden.
Finally, neglecting to test the full customer journey—from receiving the package, opening it, using the product, and potentially returning it—means missing opportunities to refine the experience. Your packaging isn't just a container; it's a touchpoint that shapes customer perception and influences repeat purchases.
Typical lead times range from 10 to 25 business days after artwork approval and deposit payment, depending on box type, material, and printing method. Add one to two weeks for artwork preparation and proof approval, plus shipping time. Plan for six to eight weeks total for a first order.
Most suppliers prefer Adobe Illustrator (.AI) files or high-resolution PDFs with fonts converted to outlines. Files must be in CMYK color mode with images at 300 DPI minimum. The supplier will provide a dieline template showing where to place your design.
Yes, most suppliers offer physical samples or press proofs for an additional fee, typically $50 to $200 depending on complexity. Samples are printed using your actual design and material, providing an accurate preview of the final product before you commit to the full order quantity.
MOQs vary by supplier and box type but typically range from 250 to 1,000 units for folded cartons and 500 to 2,500 units for corrugated boxes. Digital printing sometimes allows lower minimums—as few as 100 units—but at a higher per-unit cost than offset or flexographic printing.
Setup fees cover the cost of creating printing plates, dies, and digital files for your design. They typically range from $50 to $300 depending on the number of colors, box complexity, and printing method. Setup fees are one-time charges; reorders using the same design don't incur them again.
Inspect your order immediately upon delivery and document any damage or discrepancies with photos. Contact your supplier within 24 to 48 hours. Most suppliers will reprint orders that don't match approved specifications or arrive damaged, though you must report issues promptly to qualify for replacement.


