Cart
0
You may also like


Book a call with our development team to get started.


Apply online and access wholesale pricing.

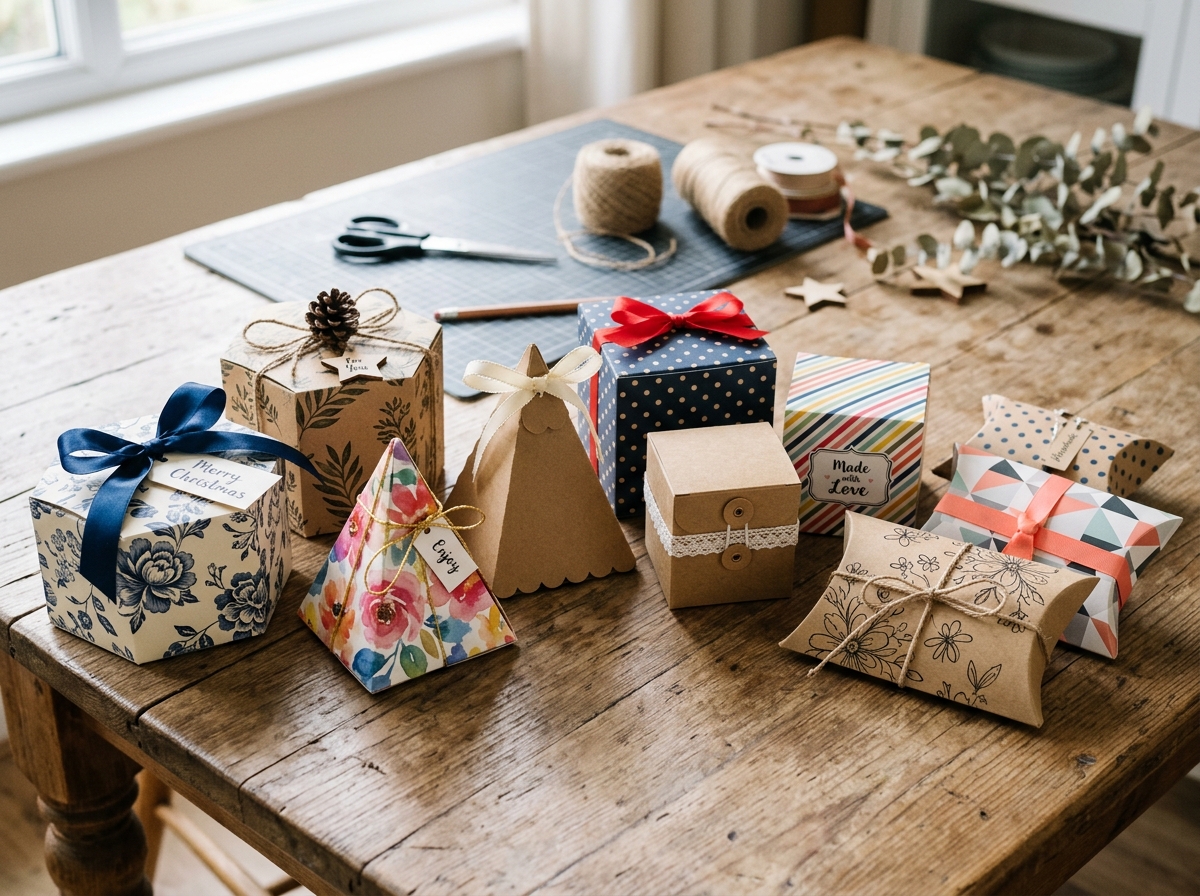
Gift box templates free printable designs offer a fast, budget-friendly way to create custom packaging for any occasion. Whether you're wrapping jewelry, cookies, small candles, or party favors, the right template lets you skip the guesswork and produce professional-looking boxes in minutes. With just a printer, cardstock, scissors, and glue, you can transform a flat sheet of paper into a pillow box, pyramid box, cube, or hexagon design—no special tools required.
This guide walks through more than ten template styles, explains which designs work best for different gifts, and shows you how to print, cut, and assemble each one. If you're already comfortable with DIY gift boxes, printable templates streamline the process even further, giving you precise fold lines and dimensions that guarantee consistent results every time.
Printable templates eliminate the trial-and-error phase of box construction. Instead of measuring, marking, and hoping your angles align, you download a file, print it on cardstock, and follow the pre-drawn cut and fold lines. This approach saves time and reduces material waste—especially valuable when you're making multiples for weddings, baby showers, or craft fairs.
Templates also offer flexibility. You can print them on plain white cardstock and decorate by hand, or use patterned scrapbook paper for instant visual interest. Many crafters print templates on the reverse side of decorative paper so the pattern shows on the outside of the finished box. This technique works particularly well with double-sided cardstock.
For small business owners, templates provide a low-cost entry point into custom packaging. You can test different box styles and sizes before committing to bulk orders, and you maintain complete control over branding by adding stamps, stickers, or printed labels after assembly.
Before you start printing, gather these materials:
If you plan to make boxes regularly, investing in a bone folder and a precision cutting mat improves both speed and finish quality. For occasional projects, household scissors and a ruler are sufficient.
Pillow boxes are the fastest template style to assemble. The design consists of a rectangular tube with curved end flaps that tuck inward, creating a soft, rounded silhouette. No glue is required for basic pillow boxes—just fold, tuck, and you're done.
Typical pillow box dimensions range from small (3 inches × 2 inches, ideal for jewelry or candy) to large (6 inches × 4 inches, suitable for scarves, soaps, or small candles). The curved flaps naturally hold lightweight items in place, but heavier contents may require a ribbon or sticker seal to keep the ends closed.
To assemble a pillow box template:
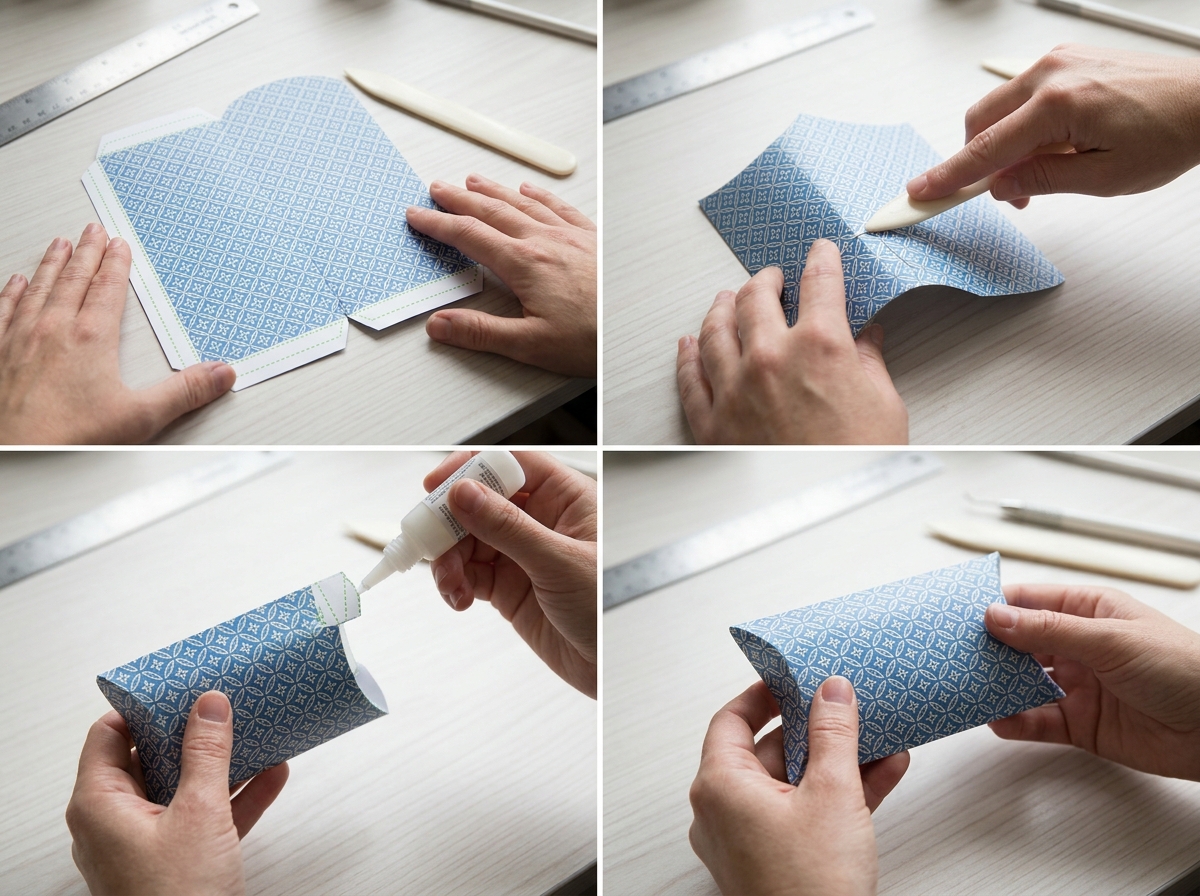
Pillow boxes photograph beautifully and stack efficiently, making them popular for wedding favors and retail packaging. If you're making gift boxes from cardstock for an event, pillow box templates let you produce dozens in an afternoon.
Pyramid boxes feature a square or rectangular base with four triangular panels that meet at a single point on top. Most templates include a small hole at the apex so you can thread ribbon through and tie a decorative bow, which also serves as a handle.
These templates work especially well for small, round items like truffles, bath bombs, or ornaments. The geometric shape adds visual interest to gift tables and displays, and the ribbon closure means no tape or glue is visible on the finished box.
Assembly steps for pyramid boxes:
Pyramid boxes stand upright on their base, so they're ideal for buffet tables or favor displays. The compact footprint also makes them easy to transport in quantity.
Cube templates produce classic six-sided boxes with either a separate lid or an integrated lid that folds over the top. The structured shape offers more protection than pillow or pyramid styles, making cubes suitable for fragile items like cookies, candles, or glassware.
Standard cube sizes include 2-inch, 3-inch, and 4-inch squares. Smaller cubes hold single truffles or earrings; larger cubes accommodate mugs, small plants, or stacked cookies. Templates typically include tabs on four sides of the base and four sides of the lid for secure closure.
When working with cube templates, precision matters. Uneven folds or misaligned tabs result in lids that don't fit properly. Use a ruler to check that your score lines are straight, and take your time folding each crease firmly before gluing.
For a professional finish, consider printing cube templates on kraft cardstock and pairing them with a structured gift box tower for layered presentations. The contrast between handmade and ready-made elements creates visual depth without requiring advanced crafting skills.
Multi-sided boxes like hexagons and octagons add an elegant, unexpected touch to gift packaging. These templates require more folds than simpler designs, but the geometric precision creates a high-end look that rivals store-bought boxes.
Hexagon boxes often feature petal-style lids where six triangular flaps fold inward to meet at a central point, resembling a flower. This closure style eliminates the need for tape or ribbon, though many crafters add a decorative seal for extra security.
Octagon templates follow a similar principle but with eight sides, offering a slightly rounder profile. Both styles work well for jewelry, small ornaments, or gourmet chocolates. The flat base ensures stability, and the intricate top draws the eye upward, creating a sense of occasion.
Assembly requires patience—each fold must be crisp and each tab aligned carefully. If you're new to multi-sided templates, start with a practice print on regular paper before cutting into your final cardstock. This lets you familiarize yourself with the fold sequence without wasting materials.
Heart-shaped templates are seasonal favorites for Valentine's Day, anniversaries, or bridal showers. The curved edges require more careful cutting than straight-sided designs, but the romantic silhouette makes the extra effort worthwhile.
Most heart box templates come in two pieces: a base and a lid. The base is typically a shallow tray with heart-shaped walls, while the lid is a slightly larger heart that fits over the top. Some templates include a ribbon slot or handle for easier lifting.
These boxes work best with lightweight contents—chocolates, handwritten notes, or small jewelry items. The curved walls don't provide as much structural support as angular designs, so avoid overfilling or using them for heavy gifts.
When printing heart templates, check that your cardstock weight is appropriate. Too-light paper will buckle under the curves; too-heavy stock may crack when you fold the rounded edges. A 80 lb cardstock offers a good balance for most heart box designs.
Takeout or Chinese food box templates mimic the familiar wire-handled containers used for restaurant carryout. These templates include a built-in handle formed by two panels that fold up and lock together at the top, creating a secure closure that doubles as a carrying grip.
The trapezoidal shape—wider at the top, narrower at the base—makes these boxes easy to fill and visually distinctive. They're popular for party favors, popcorn servings, or bulk candy displays. The handle adds functionality, especially for events where guests will be standing or moving between rooms.
Takeout box templates require a single glue seam along one side. Once that seam dries, the box folds flat for storage and pops open when needed. This collapsible feature is especially useful if you're making boxes in advance for a large event.
For a cohesive presentation, pair handmade takeout boxes with themed treat bags for a mix of packaging styles that keeps your favor table interesting without looking mismatched.
Gable boxes—also called barn boxes—feature a peaked roof with a built-in handle cutout at the top. The rectangular base provides ample space for baked goods, small toys, or craft supplies, while the handle makes them easy to carry.
These templates are particularly popular for children's parties, picnics, and bakery packaging. The sturdy construction supports heavier items than pillow boxes, and the wide opening makes filling straightforward. Many gable templates include a locking tab that tucks under the handle to keep the box closed during transport.
Assembly is simple: fold the base into a rectangular tray, glue the side seam, then fold the two peaked panels upward and lock the handle tab. The entire process takes less than two minutes per box once you've practiced the fold sequence.
Gable boxes stack efficiently when empty, so you can prepare large quantities without taking up much storage space. When filled, they sit flat on tables and display contents attractively through the open top before closing.
Plain cardstock templates serve as blank canvases for customization. Consider these decoration techniques:
If you're making boxes for a business, consider printing your logo directly onto the template before cutting. Most word processors and design programs allow you to overlay text or images onto a PDF template. Print a test copy first to ensure your logo is positioned correctly and doesn't interfere with fold lines.
For holiday or themed events, coordinate your template decoration with the occasion. Metallic gold ink suits weddings and anniversaries; bright primary colors work for birthday parties; kraft paper with twine fits rustic or eco-friendly themes.
Most templates are designed to print at 100% scale on standard letter-size paper. If you need a larger or smaller box, you can adjust the print scale in your printer settings. Keep in mind that scaling affects all dimensions proportionally—a template printed at 150% will be half again as large in every direction.
When scaling up, check that the enlarged template still fits on your paper size. You may need to print in sections and tape them together, or use larger paper stock like tabloid or A3 size. When scaling down, ensure that tabs and fold lines remain large enough to work with. Very small boxes (under 2 inches) can be difficult to assemble if the tabs become too narrow.
Test your scaled template with a practice print on regular paper before committing to cardstock. Assemble the practice box to confirm that proportions look correct and that the finished size meets your needs. This extra step prevents wasted materials and frustration.
Matching template style to gift type ensures both function and presentation:
Consider the unboxing experience as well. Boxes with lids—like cubes and hexagons—create anticipation as the recipient lifts the top. Pillow boxes and pyramid boxes offer quicker access but less dramatic reveal. Match the opening style to the gift's significance and the occasion's formality.
Template quality depends heavily on print settings. Follow these guidelines for optimal output:
If your home printer struggles with cardstock, consider printing templates at a local print shop or office supply store. Many offer cardstock printing services at reasonable per-sheet rates, and professional printers handle heavier weights without jamming.
Once you've downloaded templates, organize them by style and size in clearly labeled folders on your computer. This makes it easy to find the right design when you need it, especially if you collect templates from multiple sources over time.
For physical storage, keep printed but unassembled templates flat in a file folder or large envelope. Label the outside with the template name and size. If you've customized a template with stamps or decoration, photograph it before assembly so you have a reference for future projects.
Pre-cut templates can be stored flat or partially folded along score lines. Stack them carefully to avoid creasing, and separate different styles with cardstock dividers. This prep work is especially valuable if you're making boxes for an event—having templates pre-cut and ready to fold saves hours on the day of assembly.
Even with careful preparation, you may encounter these challenges:
If a template consistently causes problems, try a different design or source. Not all free templates are engineered with the same precision, and some may require adjustments to work with standard paper sizes or home printers.
For most templates, 80 lb to 110 lb cover weight cardstock provides the right balance of sturdiness and foldability. Lighter weights (65 lb) work for small, delicate boxes like pillow boxes for jewelry. Heavier weights (110 lb and up) suit larger boxes or designs that will hold more weight, but they require careful scoring to avoid cracking along fold lines. Test with a single sheet before buying in bulk.
Yes, as long as the paper weight is sufficient. Most scrapbook paper is 65 lb to 80 lb, which works for pillow boxes and other lightweight designs. Print the template on the reverse (plain) side so the pattern shows on the outside of the finished box. Check that your printer can handle the paper thickness, and avoid papers with heavy coatings that may smudge or jam.
No. Most templates are distributed as PDF files, which open in free programs like Adobe Reader, Preview (Mac), or your web browser. Simply download the file, open it, and print. Some templates come as image files (JPG or PNG), which can be printed from any image viewer or inserted into a word processor if you need to resize them.
Measure the finished dimensions listed in the template description, then measure your printed version before cutting. Most templates include a small ruler or measurement guide along one edge. If your print is off by more than 1/8 inch, check your printer settings—disable any "fit to page" or "scale to fit" options and select "actual size" or "100%" in the print dialog.
This depends on the template's license. Many free templates are offered for personal use only, meaning you cannot use them for commercial purposes. Some creators allow commercial use with attribution or after purchasing a commercial license. Always check the terms provided with the template. If you're packaging products for sale, consider investing in commercial-use templates or designing your own to avoid licensing issues.


